Amount exceeded

4.7 out of 5 based on 58566 reviews


4.7 out of 5 based on 58566 reviews
.
Rockwool is a great medium for growing marijuana. You can take your strain of choice through the whole cannabis life cycle with rockwool. Growers of all levels, using a variety of hydroponic setups are harvesting heavier yields a whole lot sooner. It’s about time you tried rockwool too.
Rockwool harnesses the power of natural stone to produce a fluffy and aerated growing medium ideal for cannabis growing. This material drains well, supports root development, and arrives in a cuboid shape that is easy to transplant into hydroponic or soil-based systems.
In this guide, you’ll learn everything you need to know about this robust material. Find out why to use Rockwool in both hydroponic and soil systems, how it works during every stage of the growing cycle, and much more.
Contents:
Rockwool is a branded form of mineral wool, a material used primarily as thermal and acoustic insulation in the construction of homes, hospitals, recording studios, and even stadiums.
The Danish founders of Rockwool obtained a licence in 1935 to produce stone wool in Scandinavia, Germany, and New Jersey. Over almost a century, the Rockwool company has continually refined their manufacturing process to create a more efficient and effective product.
As well as serving as a crucial building material, Rockwool has helped to facilitate the growth of hundreds of thousands, if not millions, of cannabis plants. The substance brings a host of benefits to the grow room and garden.
For one, Rockwool doesn’t contain any organic material. This means it’s immune to decomposition at the hands of mould and fungi. Rockwool is also free from heavy metals. These elements, such as lead and chromium, are highly toxic to plants, cause yellow leaves and prevent photosynthesis, and can even kill plants altogether.


The inception of mineral wool came about when observers at a volcano watched strong winds whip lava into woolly fibres.
A combination of basalt rock, fast spinning actions, and extremely high temperatures are used to make Rockwool. The process starts with a combination of basalt rock and slag recycled from the steel industry.
As a form of solidified lava, basalt rock forms underground when rock melts and then rapidly cools down. Whole basalt rocks, and briquettes made from basalt particles, are melted into lava alongside steel slag within a furnace. To replicate the extreme environment of a volcano, furnaces are cranked up to 1500°C.
Upon mimicking a volcano, the factory machinery then needs to mimic the wind. The lava enters a spinning machine that whips it into thin strands of stone wool. The addition of some binding solution oil helps to hold the strands together. Another machine layers several sheets of wool on top of each other, then a conveyor belt passes them through a series of rollers that compress the wool into a dense mat and improve its structure.
Finally, the dense sheets enter a large oven. The heat activates the binding solution and enables the wool fibres to hold their shape.
Yes! Rockwool contains basalt, which works great as a soil amendment in general. This nutrient supports the growth of every plant cell, aids in energy transfer and photosynthesis, and plays an especially important role during the flowering phase. As a bonus, basalt rock dust also helps to absorb large quantities of carbon dioxide from the atmosphere.
Shred your used Rockwool cubes into fine strips before adding them to your compost pile to speed up the rate at which they release minerals into the soil.

Technically, no. Because Rockwool contains no organic material, microbes such as fungi and bacteria won’t break it down in the same way they would food scraps, leaves, and twigs.
However, healthy soil doesn’t just contain organic substances. Vital minerals and elements required by plants are inert by nature. Some of these are locked away inside of Rockwool and will eventually end up inside your cannabis plants, where they’ll enable and support key physiological functions.
Tossed whole onto a compost pile, Rockwool will take an extremely long time to break down—hence why many growers see it as bad for the environment. You should aim to shred up your used cubes as finely as possible to accelerate this process.


We don’t recommend using the same Rockwool cube to start a new seed. Although the material itself prevents microbial growth, small pieces of roots and organic matter can end up trapped between the fibres, which can encourage the growth of detrimental fungi.
The structural integrity of a Rockwool cube will also deteriorate after a single round of growth. As the thick and strong main roots develop, they’ll make holes in the cube, in turn making it less able to accommodate another set of roots in the future.
To put your used Rockwool cubes to use, we recommend simply shredding them and tossing them onto your compost pile to recycle the nutrients within.
However, if you’re trying to grow cannabis as cheaply as possible, you can probably squeeze another plant or two out of the same Rockwool cube. First, you’ll need to submerge it in boiling water to kill off lurking pathogens dislodged from the previous root system.
Second, consider wrapping a rubber band or soft garden tie around the middle of the cube to ensure it doesn’t break in half during the next grow.
There are many benefits to growing cannabis with Rockwool, especially when doing so hydroponically.
Rockwool offers a long list of benefits to cannabis growers. Not only does it prevent pathogens from multiplying, but it helps seeds germinate and facilitates good drainage.
| Sterile |
Rockwool cubes are sterile and inorganic. After being exposed to extreme heat, Rockwool arrives at a grower’s doorstep clean and ready for use. Because it doesn't contain any organic matter, Rockwool helps to protect the root zone against damaging microbes. |
|
Compostable |
Although they take a long time to break down, growers can shred their used blocks down as finely as possible and throw them onto the compost pile. Over time, key elements within basalt rock will leach into the compost and add a nutritional kick to your future soil. |
| Good drainage |
Rockwool cubes become saturated with water when you soak them, but it quickly drains away. Each cube contains many small spaces between the fibres that help to effectively drain water. Overwatering kills many grows before they even get started. Damp conditions can foster fungal pathogens that quickly destroy seedlings. Although Rockwool cubes are largely safe from microbes, excess water can still suffocate roots and hamper growth. Good aeration stops this from happening. |
|
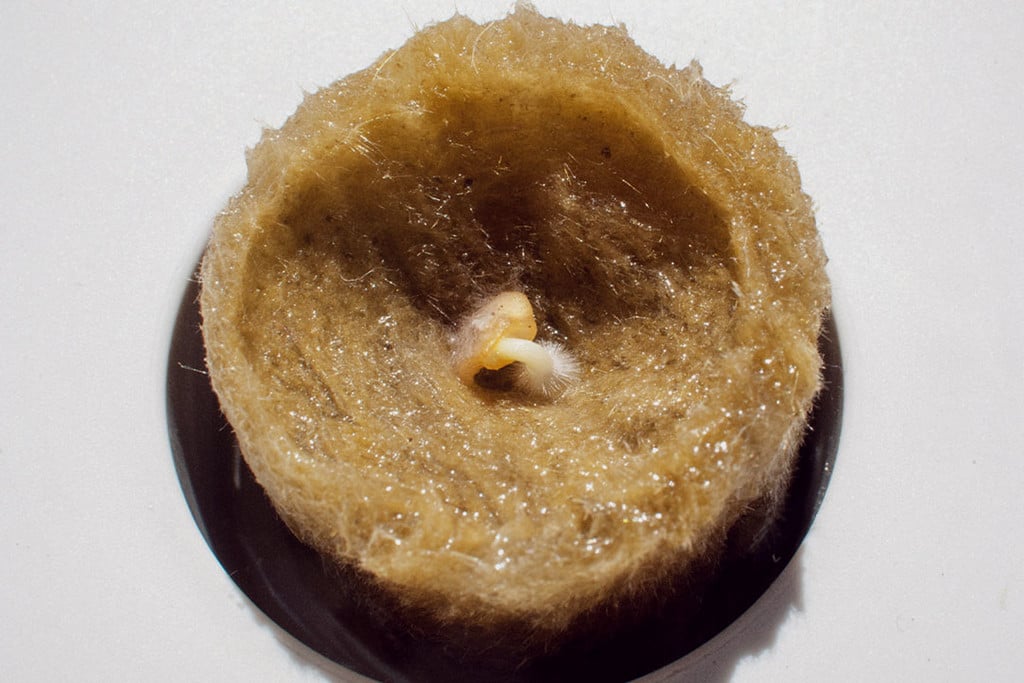
Great for germination |
Rockwool cubes provide a haven for seeds during germination. By keeping them sufficiently saturated, they provide the three key demands required for successful germination: darkness, moisture, and warmth. |
| Easy Root Penetration |
Sometimes seeds struggle to become established when sown in compact and hard soils. However, they establish themselves quickly and easily within Rockwool cubes. The young roots easily pass through the gaps between the fibres. |
| Easy To Transplant |
Once your seedling looks ready for a new home, you’ll find it incredibly easy to move it directly into a pot full of soil or a hydroponic net pot. Unlike transplanting from soil, you don’t need to break apart the initial growing medium or deal with any mess. Simply pick up the cube and slot it into its destination. |
| Sterile |
|
Rockwool cubes are sterile and inorganic. After being exposed to extreme heat, Rockwool arrives at a grower’s doorstep clean and ready for use. Because it doesn't contain any organic matter, Rockwool helps to protect the root zone against damaging microbes. |
| Compostable |
|
Although they take a long time to break down, growers can shred their used blocks down as finely as possible and throw them onto the compost pile. Over time, key elements within basalt rock will leach into the compost and add a nutritional kick to your future soil. |
| Good drainage |
|
Rockwool cubes become saturated with water when you soak them, but it quickly drains away. Each cube contains many small spaces between the fibres that help to effectively drain water. Overwatering kills many grows before they even get started. Damp conditions can foster fungal pathogens that quickly destroy seedlings. Although Rockwool cubes are largely safe from microbes, excess water can still suffocate roots and hamper growth. Good aeration stops this from happening. |
| Great for germination |
|
Rockwool cubes provide a haven for seeds during germination. By keeping them sufficiently saturated, they provide the three key demands required for successful germination: darkness, moisture, and warmth. |
| Easy Root Penetration |
|
Sometimes seeds struggle to become established when sown in compact and hard soils. However, they establish themselves quickly and easily within Rockwool cubes. The young roots easily pass through the gaps between the fibres. |
| Easy To Transplant |
|
Once your seedling looks ready for a new home, you’ll find it incredibly easy to move it directly into a pot full of soil or a hydroponic net pot. Unlike transplanting from soil, you don’t need to break apart the initial growing medium or deal with any mess. Simply pick up the cube and slot it into its destination. |
Just like every other form of growing media, Rockwool cubes also carry some unique disadvantages.
| Not Biodegradable |
Many cannabis growers and businesses are making the switch to more sustainable and environmentally friendly products and methods. The idea of used Rockwool cubes sitting in a landfill site repels some cultivators. Because many growers still don’t make their own compost, and don’t want to go to the effort of shredding up their cubes, this is exactly where many Rockwool cubes sadly end up. |
| High pH |
Rockwool cubes are naturally alkaline. Because cannabis plants prefer slightly acidic soil, growers have to stabilise the pH of their cubes before sowing seeds (you’ll find out how to do this below). |
|
Not Sustainable |
The process of making Rockwool cubes also takes a toll on the environment. In addition to the endless quarrying of basalt rock, it takes a considerable amount of coal energy to heat furnaces and power the machines needed to process the whipped-up lava wool. |
| Potentially Dangerous |
Rockwool also poses a potential health hazard to growers. New Rockwool cubes can contain a lot of loose fibres and dust. These particles can end up in the air, and even on your skin and in your eyes, mouth, and lungs. Much like asbestos, tiny fibres can build up in the lungs over time if you work with new Rockwool cubes every day. These small particles are classed as "fine mineral fibres", which the Environmental Protection Agency (EPA) in the United States has identified as probable human carcinogens[1]. |
| Not Biodegradable |
|
Many cannabis growers and businesses are making the switch to more sustainable and environmentally friendly products and methods. The idea of used Rockwool cubes sitting in a landfill site repels some cultivators. Because many growers still don’t make their own compost, and don’t want to go to the effort of shredding up their cubes, this is exactly where many Rockwool cubes sadly end up. |
| High pH |
|
Rockwool cubes are naturally alkaline. Because cannabis plants prefer slightly acidic soil, growers have to stabilise the pH of their cubes before sowing seeds (you’ll find out how to do this below). |
| Not Sustainable |
|
The process of making Rockwool cubes also takes a toll on the environment. In addition to the endless quarrying of basalt rock, it takes a considerable amount of coal energy to heat furnaces and power the machines needed to process the whipped-up lava wool. |
| Potentially Dangerous |
|
Rockwool also poses a potential health hazard to growers. New Rockwool cubes can contain a lot of loose fibres and dust. These particles can end up in the air, and even on your skin and in your eyes, mouth, and lungs. Much like asbestos, tiny fibres can build up in the lungs over time if you work with new Rockwool cubes every day. These small particles are classed as "fine mineral fibres", which the Environmental Protection Agency (EPA) in the United States has identified as probable human carcinogens[1]. |
Now that you know everything about Rockwool cubes, including their pros and cons, how should you go about using them when growing weed?
Before you pop your seeds into the cubes, you’ll need to adjust the cubes' pH to make them less alkaline. This step also gives you a chance to infuse nutrients into your cubes to give your seedlings the best start to life possible.
For this key step you’ll need:
Directions:
1. Fill up a shallow bowl with water and test the pH. Add your pH-down product until your meter shows an acidic reading of 5.5.
2. Submerge your blocks into the solution and leave them to soak for 24 hours. After a while, the alkalinity of the blocks will raise the pH of the solution. Return to the blocks once every few hours to test the solution. Re-apply the pH-down product as needed to maintain a reading of 5.5.

3. After 24 hours have passed, fill up another bowl with 1 litre of water. Add your organic nutrient solution, fungi, and bacteria to the bowl in the quantities stated on the instructions. Soak the blocks in the solution for another two hours.
4. Now your blocks have the correct pH, are loaded with nutrients, and harbour beneficial bacteria and fungi that will fuse to the roots and help them thrive later on in the growing cycle.


Rockwool makes germinating cannabis seeds super easy. Moreover, it works well for hydroponic growers who want to use cuttings.
Hydroponic growers often start things off with clones to speed up the growing process. Many soil growers use this method as well. Fortunately, cuttings root extremely well in Rockwool cubes. Use the technique below to get a head start.
1. Take a cutting: Follow the correct procedure to take a cutting from your mother plant.
2. Nourish your cutting: Dip the cut tip of your clone into rooting gel to expose it to rooting hormones, nutrients, and trace elements.
")
3. Put your clones into cubes: Use a skewer to create a sizeable hole in the top of each Rockwool cube. Inset the stem of your cutting into the hole, gently pushing it so it reaches the bottom half of the block.
4. Water, light, and humidity: Place your cuttings in a tray and place a plastic covering over them to increase the humidity. Use a spray bottle to add moisture to the bottom of the tray. Hang up some high-quality LED lights over the top of the dome on a cycle of 18 hours on and 6 hours off.
")
")
Soil growers often choose to start the process with seeds. But the process below is effective regardless of whether you grow in soil or hydro.
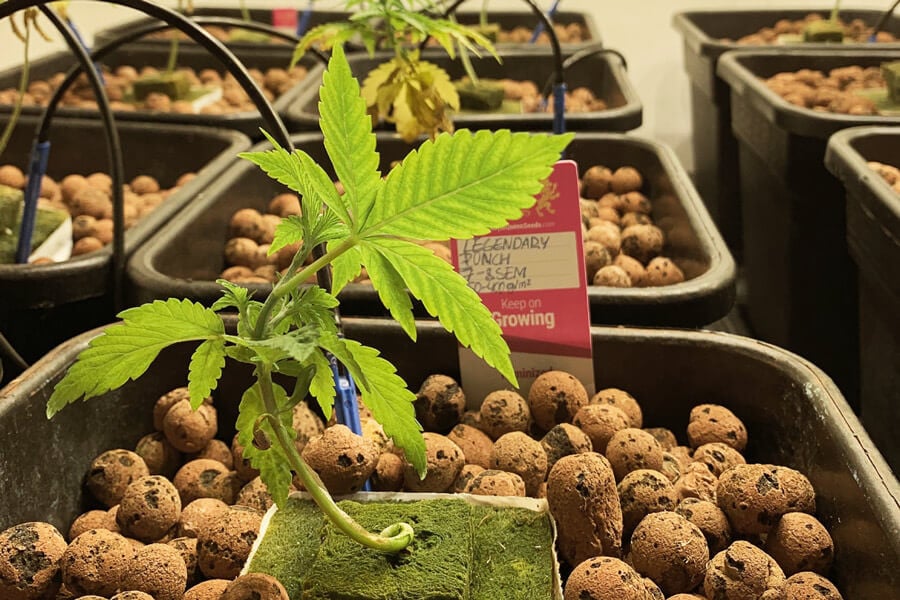
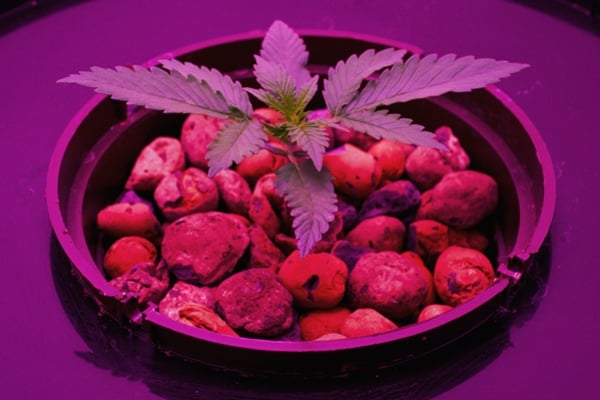
After seedlings have developed their first few sets of true leaves, they enter the vegetative phase. By this time, you’ll notice roots starting to protrude out of the Rockwool blocks. This means they’re ready for a bigger home!
When your seedlings/cuttings have outgrown their blocks, you’ll need to move them into your hydroponic setup. Before we explain how to do this, here are the best and most suitable systems to use alongside Rockwool blocks.

Once you’ve chosen your preferred technique, use the steps below to kick off the vegetative stage:
If you’re growing in soil, you can transplant the Rockwool cubes directly into your new growing medium. Soil growers have a variety of choices when it comes to what to do next. You can transplant into plastic or fabric pots, place your plants into greenhouses or polytunnels, or plant them directly into garden beds.
Some growers like to keep repotting their plants as they grow. However, for the sake of simplicity, we recommend transplanting into a fabric pot and keeping your plants there until harvest. This reduces future transplant stress and keeps plants growing quickly.
Use the steps below to transplant into soil:


The flowering phase is very similar between soil and hydroponic grows. Here are the main factors to consider.
Give your plant one last prune before it enters the flowering stage. This will allow light to penetrate the canopy so each bud site can thrive.
If you’re growing a photoperiod plant, you’ll need to switch your light cycle to 12 hours on and 12 hours off to force them to flower. If you’re growing outdoors, nature will take care of this for you. Keep autoflowering varieties on a light cycle of 18 hours on and 6 hours off if growing indoors.
Cannabis plants have different nutritional demands during the flowering stage. Clean out your hydroponic nutrient reservoir and fill it back up with a flowering formula. If you’re growing in soil, start watering your plants with bloom nutrients to ensure big, healthy buds.
Flush your soil or hydro plants one week before harvest. Restrict nutrients and only provide water to remove excess salts from the soil and allow plants to use up the last of their supplies. This will result in tastier and smoother buds.
After harvest, reclaim your cubes! If you plan on reusing them, submerge them in boiling water and give them a clean. If not, shred them up as finely as possible and dump them on the compost pile.
Here are some final tips to reference so you can master using Rockwool to grow cannabis.
Try and refrain from overwatering your Rockwool cubes during the seedling stage. They drain quite fast, and many growers get the impression that they’re underwatering. However, the inside of the cube remains nice and moist and will keep your seedlings happy without suffocating them.
Some growers attempt to squeeze their cubes like a sponge to remove excess water. Don’t do this! They drain fine on their own, and squeezing them will damage the cube and the root system of your seedlings.
Don’t place your Rockwool cubes too close together when raising seedlings. The material allows for water to drain and for air to flow through. Don’t lose this advantage by overcrowding your trays.
As you can see, Rockwool cubes offer growers plenty of benefits, from improved aeration to pathogen prevention. However, more environmentally concerned growers choose to avoid them because of how they’re made, and what they’re made of.
If you chose to reap the rewards of Rockwool cubes, why not start a compost pile? You’ll create your supply of soil and keep used cubes out of the landfill site. A win-win.