Amount exceeded

4.7 out of 5 based on 58606 reviews


4.7 out of 5 based on 58606 reviews

Contents:
Speed. Potency. Flavour. HulkBerry Automatic ticks all of the boxes, so I decided to show you one of many ways to cultivate her. Check out this in-depth growing report for a week-by-week analysis of how I achieved a rewarding yield. I’ll cover nutrient formulas, watering schedules, lighting, and much more.
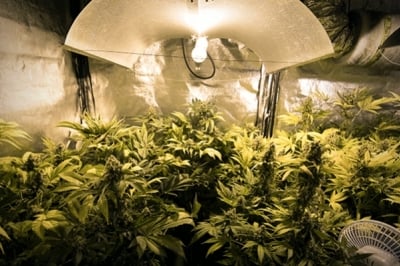
I decided to approach HulkBerry Automatic from a stealthy indoor perspective. I grew the variety in an enclosed growing box. To get the specimen off to the best start possible, I used the following gear:
Growing medium: I started by mixing the following in a large tote before adding it to my fabric pot: 10l of light, organic autoflowering potting mix; 50g of RQS Easy Boost Organic Nutrition; 5g of Easy Roots Mycorrhiza Mix.
Germination: To initiate germination, I made a 3cm-deep hole in the centre of the surface of the growing medium. I added 1g of mycorrhiza into the hole, followed by the seed, and then covered the hole lightly with the growing medium. After watering the soil to the point of saturation, the seed shoot emerged four days later.
Lighting: After sowing the seed, I set up a pair of MIGRO 200+ lights in my grow box. These units emit a warm white light that provides a full spectrum of colour, which helps to produce healthy and luscious growth. I switched my lights on as soon as the shoot emerged, positioned them 35cm from the top of the seedling, and kept them running for 24 hours each day during the seedling phase.
Nutrients: At first, seedlings utilise nutrient reserves inside the seed itself. Past this, the medium I prepared provided everything the seedling needed for its first week of life. On day 7 post-germination, I decided to feed the specimen a cocktail of nutrients to help her maintain a healthy growth pattern. I mixed the following quantities into 1 litre of water:
I also regulated the pH of the solution to 6.5 using a pH tester and an organic pH regulator.
Environment: To optimise germination, I maintained a temperature of 26°C and a humidity of 60–65% inside the grow box.
Plant status: 7 days after germination, my HulkBerry Automatic specimen reached a height of 10cm and developed three sets of vibrant-green true leaves.
")
")
Within a week of germination, my plant surged through the seedling stage and entered the vegetative period. During this time, she began to pack on size and put out fan leaves to soak up all of the light I provided.
The plant doubled in size over the first week of the veg phase, thanks to sufficient lighting, proper nutrition, and a well-designed growing medium.
Lighting: I kept the lights running for 24 hours each day and maintained a distance of 35cm between the light source and the top of the canopy, adjusting the lights as the plant grew.
Nutrients: I decided to feed my plant on the third and seventh day of this week. I increased the nutrient value to keep up with the growing demands of the plant:
Again, I adjusted the pH to 6.5 and watered the growing medium to the point of saturation. I also administered 0.5l of water every 24 hours to keep the specimen hydrated and turgid.
Environment: I maintained a temperature of 27°C and a relative humidity of 60% inside the grow box to keep the plant thriving.
Plant status: By the end of the week, my HulkBerry Automatic plant reached a height of 20cm and already had a dense canopy of fully formed and luscious fan leaves.
")
")
Things started to speed up significantly as week 3 swung around. My plant more than doubled its height, produced many new branches and leaves, and started to show signs of pre-flowers.
Lighting: I kept my lights blaring away 24 hours each day to maximise photosynthesis. This helped the plant surge in size over a short period. I continued to maintain a distance of 35cm between the light and canopy as the plant grew upward.
Nutrients: My nutrient strategy remained similar to that of week 2, and I continued to regulate the pH of my water in the same fashion. However, I stopped watering every 24 hours, and only administered fluids when the top 5cm of the growing medium became dry. I also added 1.5ml of calcium and magnesium to every litre as a preemptive effort to avoid potential deficiencies.
Environment: I maintained a temperature of 27°C in the grow box, but decided to reduce humidity to 55% as I approached the flowering stage.
Plant status: By the end of the vegetative phase, my plant reached 45cm in height and started to produce pre-flowers at many of the nodes. The plant looked completely healthy and continued to develop a bushy canopy ready to start housing flowers.
")
")
This is where things started to get exciting! Watching the pre-flowers rapidly start to swell reminded me of just how far autos have come in recent years.
To accommodate my newly flowering plant, I changed up my strategy. Primarily, I reduced lighting hours and tweaked nutrition to encourage healthy blooming.
Lighting: I altered the light cycle to 20 hours on and 4 hours off. This gave the plant more than enough light exposure to keep photosynthesising optimally and begin churning out flowers. However, the 4 hours without light gave the specimen a small window to direct the accumulated energy toward growth and flower development. I continued to maintain a distance of 35cm between the light and the top of the canopy.
Nutrients: I switched up the nutrients, adding more phosphorus and potassium to the mix. Cannabis plants need higher levels of these vital macronutrients to form big and healthy buds. I added the following into 1 litre of water:
I applied this mix once at the start of week 4 and again at the start of week 5. In between feeds, I saturated the growing medium with plain water every time the top 5cm became completely dry, to avoid overwatering.
Environment: During weeks 4 and 5, the grow box maintained a steady heat of 27–28°C. This is close to the higher end of what cannabis can tolerate, but growing throughout summer means these temperatures are likely. My fan helped to keep temps from rising any higher. I also managed to maintain a humidity of 55% using my humidifier.
Plant status: My HulkBerry Auto specimen started to develop a faint smell of terpenes at this point, which made opening the grow box door a pleasant experience every time. I defoliated the plant at the start of week 5 by removing selected leaves near the top of the canopy to increase light penetration. At the end of week 5, the plant stood at 100cm.
")
")
")
My HulkBerry Auto plant started to stretch and pack on size during weeks six and seven. To help this jungle-like canopy fill out with buds, I increased the potency of the nutrition formula.
Lighting: I maintained a light schedule of 20 hours on and 4 hours off. The use of a timer made this process effortless.
Nutrients: I used the same nutrients as before, but ramped up the quantities as the flowers started to put on size. I also added liquid humic and fulvic acid to further fuel flowering. My formula looked like this:
On day one of week six, I watered the plant with the calcium/magnesium formula and adjusted the pH to 6.5 once more. I proceeded to apply the rest of the nutrients on day 5 of week 6, and repeated the same feeding regimen during week 7.
Environment: The heat remained a challenge during the peak of summer. I set my fan and extractor to maximum, but the temperature still lingered at 29°. However, the plant continued to grow just fine. Humidity also became a bit of an issue as I struggled to get it below 60%. I considered setting up a dehumidifier to reduce the risk of mouldy buds.
Plant status: My plant stood at 117cm at the end of week six. The flowers were starting to swell and the aroma grew more potent.
")
")
")
Lighting: I maintained the same lighting conditions during week 8, keeping the source at 35cm above the canopy. The plant had basically stopped growing at this point, so I didn’t have to constantly reposition the light.
Nutrients: I ceased nutrient application during the entirety of week 8 to commence the flushing process. Restricting nutrients forces flowers to use up their reserves, which some believe makes for tastier and smoother smoke/vapor.
Environment: The temperature and humidity issues continued. However, my plant continued to thrive in a heat of 28°C and humidity of 60% with no signs of mould (I decided not to intervene with a dehumidifier).
Plant status: HulkBerry Auto remained at a height of 117cm. I defoliated yellowing leaves toward the base of the plant, and also removed a good amount of leaves in the upper canopy to expose the buds to more light. The flowers had pretty much all bulked up, and the aroma became very strong upon opening the grow box.
")
")
The final week! During this time, I continued flushing the plant. Other than that, I pretty much left it to do its thing.
Lighting: The exact same as before: 20 hours on and 4 hours off.
Nutrients: None. I only administered pH-regulated water when the growing medium became dry.
Environment: Temperatures remained at 28°C. The humidity finally dropped to an acceptable 50%, which helped to protect the specimen from mould.
Plant status: The plant ultimately topped out at 117cm in height. The flowers were extremely resinous, with the trichomes becoming milky and the pistils switching from white to orange (two key signs that it’s time to harvest).
")
")
HulkBerry Automatic exceeded my expectations! This variety charged through the growing cycle, providing a bounty only 64 days after sprouting. I noticed no signs of diseases, and very few signs of stress, despite suboptimal fluctuations in temperature and humidity. At the end of week 9, I chopped the branches down and trimmed each flower individually before placing them in a herb dryer. As soon as they dried, I moved them into curing jars for four weeks to improve their flavour and smoothness. Overall, I managed to achieve 60g of dried bud from a single HulkBerry Auto plant.
")
")
Are you intrigued by HulkBerry Automatic after this grow report? I highly recommend giving her a go, especially if you’re dealing with a small indoor space. This fast-growing hybrid will churn out a weighty yield in almost no time at all.
HulkBerry Automatic stems from a cross between HulkBerry and Diesel Auto. This combination gave rise to a genetic profile of 65% sativa, 30% indica, and 5% ruderalis in the progeny. The parents also passed down genes that code for high levels of THC and rapid growing times.
This compact cultivar appeals to growers looking for stealth. You can raise her in compact boxes or even converted buckets indoors. Likewise, she makes a superb candidate for outdoor guerrilla growing locations. Indoor plants reach a height of 80–120cm and produce a fantastic yield of up to 500g/m². Their outdoor counterparts reach the same height and churn out up to 150g/plant. The best part? You only need to wait 8–9 weeks after germination to harvest some sticky buds.

|
|
Hulkberry x Diesel Auto |
|
|
450 - 500 gr/m2 |
|
|
80 - 120 cm |
|
|
45 - 55 days |
|
|
Up to 21% |
|
|
Sativa 65% Indica 30% Ruderalis 5% |
|
|
100 - 150 gr/plant |
|
|
80 - 120 cm |
|
|
Clear, Uplifting |
|
|
Low |
|
|
55 - 65 days after germination |
HulkBerry Auto boasts huge quantities of THC for an autoflowering variety, at 21%. Her sativa-dominant genetics and refreshing terpenes contribute to an uplifting high perfect for daytime sessions. As you feel the effect set in, the delicious flavour of citrus, diesel, and fruit will linger on your taste buds.
HulkBerry Automatic is a great introductory strain to the world of cannabis growing. She’s resistant to pests and disease, provides a harvest in a matter of weeks, and doesn’t require too much fuss. Plus, her THC levels rival many photoperiod strains, and her terpenes make her one of the tastiest strains around. If you’re looking for a fast-growing and compact strain, you need to give her a go.