By Luke Sumpter

Watermelon Auto: Week-by-Week Grow Report

blog cover

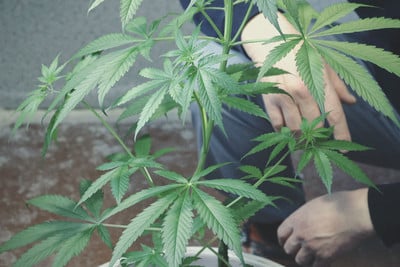
Are you thinking about growing Watermelon Automatic? Then you're in the right place! Below, you'll find out exactly how I grew this variety, including the details of my lighting setup and feeding regimen. If you enjoy fruity terpenes, stoning effects, and quick yields, you don't want to miss this!


Watermelon Auto Grow Report: Equipment List

  • Box: Secret Jardin DS120W 120 × 60 × 178
  • Lights: MIGRO 200+
  • Ventilation: Blauberg Turbo - E 100
  • Filter: Prima Klima filter PK 100/125
  • Fan: Oscillating Koala Fan
  • Humidifier: Beurer LB 45
  • Soil: Biobizz Light·Mix
  • Pot: 11l Air-Pot
  • Seed: Royal Queen Seeds
  • Nutrition: Biobizz and RQS Organic Nutrition

Watermelon Auto Grow Report: Seedling Stage (Week 1)

Welcome to the start of my Watermelon Auto growing journal! To kick things off, I first had to successfully germinate my seed. It might seem like a simple task, but things often go wrong at this stage. Growers either let their seeds dry out or keep them too damp, which causes them to rot. Find out what I did to get things going the right way.

  • Growing medium: Before popping my seed into the soil, I prepared a suitable growing medium. I started by filling my Air-Pot with 5l of Biobizz Light·Mix. I then added the following ingredients:

50g RQS Easy Boost Organic Nutrition
10g RQS Rhizobacter
5g RQS Mycorrhiza Mix

Ingredients for Seedling Stage

The nutrients in this mix would provide most of my plant's nutritional needs throughout the early stages of the growing cycle. Likewise, the inoculants helped to boost nutrient uptake and fight against pathogens that cause seedling diseases such as damping off. After adding these inputs, I mixed them thoroughly with the soil.

Next, I added another 5l of Biobizz Light·Mix into the Air-Pot and mixed again. I then watered the growing medium until it was saturated.

  • Germination: I made a 2cm-deep hole in the middle of the surface of the growing medium, then inserted the seed and added a sprinkle of RQS Rhizobacter and Mycorrhiza Mix to ensure early inoculation. I covered the site with a thin layer of Light·Mix and misted lightly.
  • Lighting: Next, I set up my lighting system. I took a couple of ratchet straps and hung my MIGRO 200+ lamps from the top of my grow box. I suspended each lamp 35cm horizontally from the midline and 35cm vertically from the top of my Air-Pot. I linked my lamps to a timer and set them to run for 24 hours each day after the sprout emerged from the soil.
  • Plant status: As week 1 came to a close, my seedling stood at around 5cm tall. Unfortunately, I noticed a bit of stretching, despite adequate light exposure. This occurred because the seed casing had become stuck on the cotyledon leaves. I decided to leave the casing on, for the time being, to avoid damaging these delicate leaves.
Watermelon Growing Report: Week 1

Watermelon Auto Grow Report: Vegetative Stage (Week 2–4)

I made it through the seedling stage! From here on out, I set the goal of fuelling healthy vegetative growth. To achieve this, I set about feeding my young plant with nutrients high in nitrogen, and exposing it to light every second of the day (and night). Find out exactly what I did during the vegetative stage below.

Week 2

Not to toot my own horn, but my plant cruised through the first week of veg. The seedling soon freed itself of the seed casing and unleashed several luscious sets of true leaves.

  • Lighting: I continued to run my lights for 24 hours per day and repositioned them to hang 35cm from the tip of my plant.
  • Nutrients: On day 3 of the week, I added 4ml of Biobizz Root·Juice into 1l of water adjusted to a pH of 6.2. I also watered my plant with 1l of pH-adjusted water on day 5 of the week.
  • Environment: Throughout the growing cycle, I took frequent temperature and humidity readings using a digital thermo-hygrometer. During week 2, I recorded an average temperature of 23°C and a relative humidity of 55%.
  • Plant status: By the end of week 2, my plant had reached a height of 10cm, developed healthy-looking fan leaves, and showed no signs of deficiency or disease.
Watermelon Growing Report: Week 2

Week 3

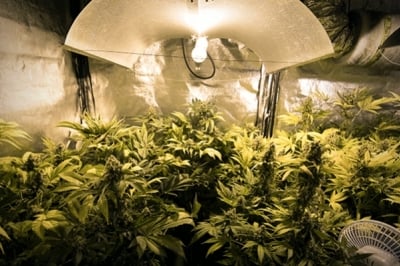
Things continued to look great throughout week 3! My plant developed a luscious dark green shade and started to form a dense canopy.

  • Lighting: I continued to run my lights for 24 hours per day and repositioned them to hang 35cm from the tip of my plant.
  • Nutrients: My plant seemed well-fed at this point, so I decided to avoid feeding this week. Instead, I administered 1l of pH-adjusted water on days 2 and 5 of the week.
  • Environment: I recorded an average temperature of 24°C and a relative humidity of 50%.
  • Plant status: My plant stood at 20cm, doubling in size from the end of last week!
Watermelon Growing Report: Week 3

Week 4

Wow, would you look at that—we’re already at the final week of the vegetative phase! Check out what I did during this transition into bloom.

  • Lighting: I continued to run my lights for 24 hours per day and repositioned them to hang 35cm from the tip of my plant.
  • Nutrients: I added ⅓ of an Easy Grow Booster Tablet to 2l of pH-adjusted water and applied it on day 2 of the week. On day 5 of the week, I put together the following formula in 2l of water:

3ml Cal-Mag
4ml Biobizz Bio·Heaven
4ml Biobizz Bio·Grow
4ml Biobizz Acti·Vera

  • Environment: Temperature clocked in at 25°C and humidity at 45%.
  • Plant status: My plant continued to look healthy and vibrant. At the end of the week, I started to see white stigmas protruding from the nodes—a sure sign of the impending bloom stage.

Watermelon Auto Grow Journal: Flowering Phase (Week 5–11)

Welcome to the flowering phase! The vegetative period passed quickly with no issues whatsoever—a testament to the superb genetics of Watermelon Auto. Next, find out what I did during bloom in this Watermelon Auto week-by-week report.

Week 5

My plant looked mostly healthy during this time. However, I did spot a cause for concern in the form of brown spotting on the lower leaves.

  • Lighting: I changed the setting on my timer to keep my lamps running for 20 hours per day. I repositioned my lamps to hang 35cm above the tip of my plant.
  • Nutrients: I applied 1.5ml of Cal-Mag to 1l of water and applied it on day 2 of the week. On day 3, I added the following to 2l of water:

3ml Cal-Mag
4ml Biobizz Bio·Heaven
4ml Biobizz Acti·Vera
2ml Biobizz Alg·A·Mic
2ml Biobizz Top·Max
2ml Biobizz Bio·Bloom
4ml Biobizz Bio·Grow

I gave my plant a further 1l of water adjusted to a pH of 6.3 on day 5 of the week.

  • Environment: I recorded a temperature of 25°C and a humidity of 42%.
  • Plant status: My plant seemed healthy overall, except for the aforementioned brown spotting on the lower foliage. I assumed it was a fungal infection at first. However, I ended up putting it down to excess fertiliser, and decided to closely monitor the symptoms.
Watermelon Growing Report: Week 5

Week 6

Things started to look really promising during week 6! My plant had started to develop plenty of small buds, and the central colas started to stretch and shoot up toward the ceiling. I even started to see trichomes developing and detected a slight aroma every time I entered the grow box. However, I also saw the spotting on the leaves progress even more.

  • Lighting: I repositioned my lamps to hang 35cm above the tip of the canopy and kept them running for 20 hours per day.
  • Nutrients: On day 2 of the week, I added the following to 2l of water:

4ml Biobizz Bio·Heaven
4ml Biobizz Acti·Vera
4ml Biobizz Alg·A·Mic
2ml Biobizz Top·Max
4ml Biobizz Bio·Bloom
4ml Biobizz Bio·Grow

I held off on the Cal-Mag this week in fear of overdoing things and worsening the symptoms I noticed the previous week. On day 5 of the week, I simply watered with 1l of pH-adjusted water.

  • Environment: Temperature clocked in at 25.2°C and humidity at 39%.
  • Plant status: My plant had reached a height of 61cm with plenty of small buds forming. However, the brown and yellow patches on the leaves started to worsen, moving across the leaflets.
Watermelon Growing Report: Week 6

Week 7

Hello, week 7! Things continued to go well overall. The buds continued to swell and put out a pleasant aroma. My plant kept on stretching upward, a phenomenon typical of the early flowering phase. Unfortunately, the discolouration continued to spread on select leaves, leading me to take some more drastic action!

  • Lighting: I continued to run my lamps for 20 hours each day. I readjusted them to hang 35cm above the top cola.
  • Nutrients: On day 2 of the week, I placed 1 Easy Bloom Booster Tablet into 5l of water. I decanted 2l into a separate can and watered my plant, leaving the remaining 3l for later use.

On day 5 of the week, I added the following in 2l of water and fed my plants:

3ml Cal-Mag
6ml Biobizz Bio·Heaven
6ml Biobizz Acti·Vera
4ml Biobizz Alg·A·Mic
2ml Biobizz Top·Max
4ml Biobizz Bio·Bloom
6ml Biobizz Bio·Grow

  • Environment: I recorded an average temperature of 25°C and humidity of 40%.
  • Plant status: My plant looked healthy overall and had reached a height of 70cm. To deal with the discolouration issue, I decided to defoliate all of the lower leaves and any affected leaves higher up on the plant. As well as improving the appearance of my plant, it also helped to increase aeration and light penetration in the canopy.
Watermelon Growing Report: Week 7

Week 8

We’re almost there! In this segment of my Watermelon Auto week-by-week guide, I’ll cover the last application of nutrients before entering the flushing phase. Find out what I did to give my plant that last little push toward the finish line.

  • Lighting: Yep, you guessed it—I kept running my lamps for 20 hours each day.
  • Nutrients: On day 2 of the week, I simply applied 2l of water adjusted to a pH of 6.3. On day 5, I added the following to 2l of water:

8ml Biobizz Bio·Heaven
8ml Biobizz Acti·Vera
6ml Biobizz Alg·A·Mic
2ml Biobizz Top·Max
6ml Biobizz Bio·Bloom
6ml Biobizz Bio·Grow

  • Environment: I recorded an average temperature of 25.5°C and relative humidity of 36%.
  • Plant status: My plant looked much better after some defoliation. I noticed the buds start to develop a lovely dark purple hue—a sign of anthocyanin production.
Watermelon Growing Report: Week 8

Week 9–11

Things became very simple from this point onward. I stopped feeding my plant in order to flush it for the 3 weeks leading up to harvest. The theory goes that this technique forces plants to use up their nutrient reserves, resulting in a smoother and tastier smoke.

  • Lighting: I continued to run my lamps for 20 hours each day until the end of the growing cycle.
  • Nutrients: My plants received nothing but good old water up until harvest. I applied 2l on days 2 and 5 of the remaining weeks.
  • Environment: Overall, I recorded an average temperature of 25°C and humidity of 38%.
  • Plant status: As expected, my plant quickly turned from luscious and green to yellow and orange during the flushing process. While this would be a cause for concern in the earlier stages, it simply indicated that the flushing worked! At this point, my buds look swollen and loaded with trichomes. It was time to harvest!
Watermelon Growing Report: Week 9

Watermelon Auto Grow Report: Harvest (Week 12)

In only 10 weeks following the seedling stage, I had a mature Watermelon Auto plant ready to harvest! To kickstart this process, I cut my plant at the base and hung it upside down from the top of my grow box. I kept my fan running but shut off the lamps. After 2 weeks of drying, I trimmed my flowers and assessed my yield, which weighed in at 56 grams. I then loaded the buds into curing jars for a further month to refine their flavour.

Genetics of Watermelon Auto

So, are you curious about growing Watermelon Auto? I don't blame you! This visually stunning strain, created by Royal Queen Seeds, descends from parent strains Tropicanna Cookies and Lemon OG and produces gorgeous purple-green flowers packing a THC content of 20% and a host of fruity terpenes.

Watermelon Growing Report: Harvest

Growing Characteristics of Watermelon Auto

Watermelon Auto grows great practically anywhere, provided she receives enough light and nutrients. Indoor plants grow to 80–110cm, making them suitable for small grow tents and spare cupboards. Prepare to harvest up to 500g/m² in as little as eight weeks after seeds sprout. Outdoors, you’ll watch plants peak at 120cm and yield 50–90g/plant.

Effects and Flavour of Watermelon Auto

This strain delivers a fast-acting and long-lasting body high that reddens the eyes and stills the mind. Seconds after taking a hit, you’ll experience potent flavours of watermelon roll across your tongue. Not long after, you’ll feel your muscles start to relax as your appetite surges.

Watermelon Auto
Tropicanna Cookies x Lemon OG
450 - 500 gr/m2
80 - 110 cm
6 - 7 weeks
THC: 20%
Sativa 20%, Indica 75%, Ruderalis 5%
50 - 90 gr/plant
100 - 120 cm
8 - 9 weeks after sprouting
Calming

Buy Watermelon Auto

Are you aged 18 or over?

The content on RoyalQueenSeeds.com is only suitable for adults and is reserved for those of legal age.

Ensure you are aware of the laws of your country.

By clicking ENTER, you confirm
you are
18 years or older