Cherry Pie Auto Grow Report
Video id: xae1xe6

Cherry Pie Automatic is a fast-growing, high-yielding autoflower from Royal Queen Seeds, known for its fruity aroma, balanced hybrid effects, and visually striking buds. In this detailed grow report, I’ll take you through every stage, from germination to harvest, covering equipment, lighting, nutrients, and environmental conditions. Whether you’re an experienced grower or trying an autoflower for the first time, this week-by-week guide provides actionable insights and practical tips to maximise growth, potency, and flavor while maintaining healthy plants throughout their lifecycle. Continue reading for some top-tier grow reporting!
Cherry Pie Automatic Week-by-Week Grow Report: Equipment List
As in the rest of my grow diaries, I’ve provided a detailed list of the equipment I used in this cycle:
- Box: Secret Jardin DS120W 120 × 60 × 178 cm
- Lights: MIGRO ARAY 4 - 240 W
- Ventilation: TT Silent-M 100
- Filter: Primaklima filter PK 100/125
- Fan: Oscillating Koala Fan
- Soil: BioBizz Light - Mix
- Pot: 11 L fabric pots
- Seed: Royal Queen Seeds
- Nutrition: RQS Organic NutritionThis setup has proven reliable for autoflowering strains, combining adequate airflow, gentle LED lighting, and a nutrient-rich soil medium to support rapid growth without over-complication.
Cherry Pie Automatic Grow Report: Seedling Stage (Week 1)
Welcome to germination! Below, you’ll find the steps I took to ensure my Cherry Pie Auto plants got off to the best start possible.
- Germination: I started my Cherry Pie Auto seeds directly into 11 L Geotextile Fabric Pots. This helped to prevent any transplant stress that usually occurs when starting in cells or smaller pots. The material of the pots also helps to balance aeration and drainage, enhancing root system health.
- Lighting: The MIGRO ARAY 4 was set to 18 hours on per day and positioned 35 cm above the emerging seedlings, dimmed to 40%.
- Growing medium: Starting with 10 L of BioBizz Light Mix, I added 50 g of RQS Easy Boost Organic Nutrition pellets, 10 g of Seaweed, and 5 g of Easy Roots Mycorrhiza Mix per pot. The mix was thoroughly blended and saturated with water containing Cannabis Seed Booster (30 drops per 1 L) to jump-start growth. I created a small hole in the soil, placed the seed, lightly covered it, and misted it gently.
- Environment: Average temperature was around 30 °C with 60% relative humidity. Soil temperature hovered around 24 °C, keeping the roots warm for optimal germination.
- Plant status: By the end of the first week, seedlings had emerged successfully. Each plant measured approximately 3–3.5 cm, displaying its first sets of true leaves with strong, healthy stems and no signs of stress.


Cherry Pie Automatic Week-by-Week Grow Guide: Vegetative Stage (Weeks 2–4)
With my Cherry Pie Automatic seedlings now standing proudly above the soil, the vegetative phase had begun. Find out how I fed, watered, and cared for my plants below to help them cruise through this stage with minimal issues.
Week 2
During the first week of veg, my plants doubled in size and endured the tough summer heat in my apartment well.
- Lighting: 18-hour photoperiod maintained, LED still dimmed to 40%, positioned 35 cm above the canopy.
- Nutrients: To feed my young plants, I added 4 ml of RQS Bio-Grow Fertiliser and 4 ml of a calcium and magnesium supplement for 4 L of water adjusted to a pH of 6.0. I applied this solution to all three of my plants on days three and six of the week.
- Environment: The hot summer heat caused an average daytime temperature of 30 °C, and humidity hovered around 60%.
- Plant status: Seedlings displayed compact internodes and vibrant color. Slight stress from heat was mitigated by careful watering. My plants stood at 7 cm at the end of the week.
Week 3
During week three of the growing cycle, my Cherry Pie Auto plant exploded in growth. It developed new and luscious fan leaves and pre-flowers started to form at the nodes.
- Lighting: I maintained a photoperiod of 18 hours of light and increased the power of my lights to 60% to fuel vegetative growth. I adjusted the ratchet straps to position the light 35 cm above the tip of the canopy.
- Nutrients: I applied a similar nutrient solution as the previous week, but increased the amount of water and nutrients. I added 6 ml of RQS Bio-Grow Fertiliser and 6 ml of a calcium and magnesium supplement for 6 L of water adjusted to a pH of 6.0. Again, I applied this mix across all three of my plants on days three and six of the week.
- Environment: I recorded an average temperature of 30 °C and humidity of 55%.
- Plant status: My plants reached 17 cm by the end of the week. They exhibited strong stem and leaf structure, and pre-flowers had started to emerge.
Week 4
Welcome to week four of my grow journal! My Cherry Pie Auto plants entered the end of the vegetative stage. Check out how I helped them thrive in the final stretch before bloom.
- Lighting: I continued to run my lights for 18 hours per day, but increased their power to 80% as my plants were starting to grow larger and more quickly. Again, I adjusted them to hang 35 cm from the top of the canopy line.
- Nutrients: My plants started to require more water as they grew larger, especially with the summer heat still raising the temperature of the grow box. This week, I added 8 ml of RQS Bio-Grow Fertiliser and 8 ml of a calcium and magnesium supplement to 8 L of water adjusted to a pH of 6.0. Sticking to the same routine, I applied this solution on days three and six of the week.
- Environment: I noted an average daytime temperature of 29 °C and humidity of 55%.
- Plant status: My plants shot up in size again, reaching an impressive 37 cm by the end of the week. They had developed dense canopies and boasted a strong green color. The pre-flowers had now formed long white pistils.
Cherry Pie Automatic Grow Guide: Flowering Stage (Weeks 5–10)
And just like that, my Cherry Pie Automatic plants had entered the flowering stage! During this phase, the summer heat continued to prove challenging, and I changed my nutrient mix to help facilitate the formation of dense and sticky buds.
Week 5
Here’s what I changed in the first week of bloom.
- Lighting: I continued to run my lights for 18 hours each day, once again ratcheting them up to hang 35 cm above the canopy.
- Nutrients: To supply higher levels of phosphorus and potassium during flowering, I switched to a bloom nutrient formula. I added 13.5 ml of RQS Bio-Bloom Fertiliser and 9 ml of a calcium and magnesium supplement to 9 L of pH-adjusted water and applied the mix on days three and six of the week.
- Environment: I recorded an average daytime temperature of 28 °C and humidity of 50%.
- Plant status: Overall, my plants seemed healthy, and the flowers started to develop nicely. However, I noticed some slight yellowing and drooping, probably caused by the intense heat. By the end of the week, my plants had stretched to around 60 cm.
Week 6
Growth started to slow down after my plants stretched vigorously last week. However, having diverted their energy to flowering, the buds started to thicken and a weak smell permeated the air.
- Lighting: I continued the same light cycle, raising the light to once again hang 35 cm from the highest point of the canopy.
- Nutrients: I applied the same nutrient solution as the previous week on days three and six of the week.
- Environment: The average daytime temperature clocked in at 28 °C and humidity lowered to 45%, ideal to reduce the risk of mold during flowering.
- Plant status: My plants finished the week standing at a compact 72 cm. The leaves maintained their dark green color and the buds started to get big, developing sugar leaves and plenty of white pistils.
Week 7 & 8
During the next two weeks of bloom, the buds changed from bulbous and small to larger and more tapered. A stronger smell started to emanate from the plants, and I could sense the harvest getting closer.
- Lighting: I continued to run my lights for 18 hours and readjusted the height.
- Nutrients: I applied the same nutrient mix across both weeks by adding 13.5 ml of RQS Bio-Bloom Fertiliser and 9 ml of a calcium and magnesium supplement to 9 L of pH-adjusted water. I maintained the same routine of applying the solution on days three and six of the week.
- Environment: Average temperature remained at 28 °C, with humidity dropping to a more suitable 40%.
- Plant status: The flowers became seriously chunky and sticky at this point, and the smell became very powerful as they moved into week nine.
Week 9 & 10
Big flowers. Yellowing leaves. Copious amounts of resin. The signs were in place for an approaching harvest! During the final two weeks, I withheld all nutrients to flush my plants for better flavors and smoother smoke.
- Lighting: I continued to run the lights for 18 hours per day, repositioning them for the final time 35 cm above the highest colas.
- Nutrients: I withheld all nutrients. I simply applied 9 L of pH-adjusted water across all three of my plants on days three and six of both weeks.
- Environment: I logged an average temperature of 28 °C and stable humidity of 40%.
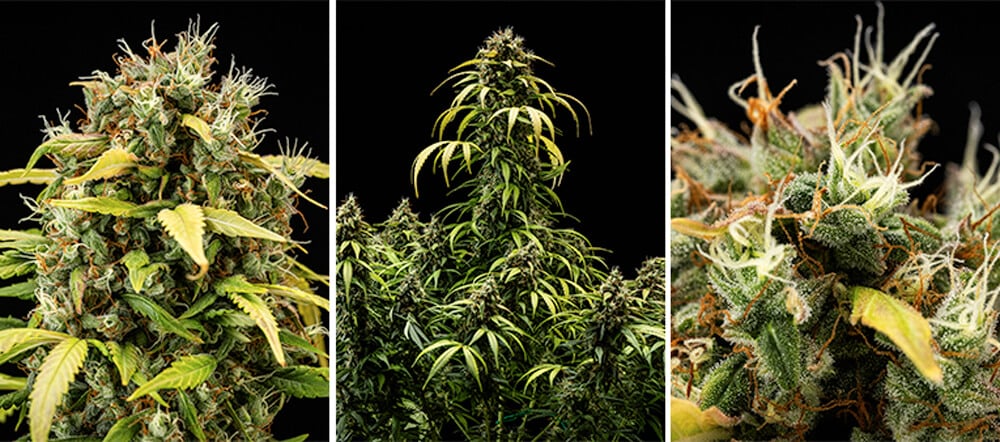
- Plant status: I made it all the way to harvest with minimal issues! My flowers were big, mature, flushed, and smelled extremely potent. It was time to harvest.
Cherry Pie Automatic Grow Report: Harvest
It’s time to bring this grow diary to a close with harvest! I cut my plants at the base and hung them upside down from the top of the grow tent. I turned off the lights to preserve the terpenes and cannabinoids and left the fan running to speed up drying and reduce the chances of mold. After 18 days, the stems snapped cleanly, indicating dryness. I dry-trimmed my buds and weighed them; I’d brought in 87 g per plant. I then placed them in curing jars for six weeks before enjoying the fruits of my labor.
Cherry Pie Automatic Characteristics
If you want to get to know more about Cherry Pie Automatic after reading my week-by-week grow report, check out the strain in more detail below.
Genetic Attributes of Cherry Pie Automatic
Cherry Pie Automatic combines the sweet, fruity traits of Granddaddy Purple with the cerebral, uplifting qualities of Durban Poison. As an autoflowering version of Cherry Pie, it balances indica and sativa genetics, delivering a hybrid that’s both flavorful and stimulating. Its lineage gives it a unique profile: mentally energising yet physically relaxing, making it a versatile choice for any time of day.
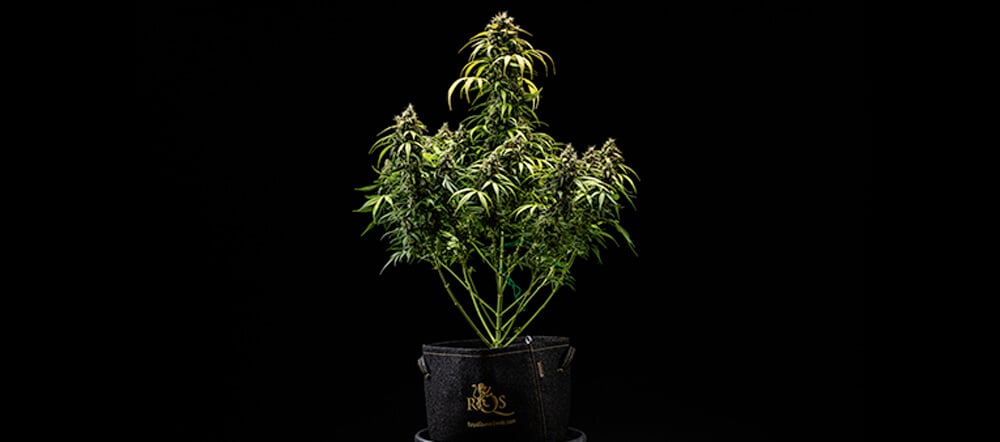
Growing Characteristics of Cherry Pie Automatic
This autoflower grows impressively large, reaching up to around 100 cm indoors with a pronounced main cola and dense side branches. Indoor yields can reach 450 g/m² in just nine weeks, while outdoor plants stretch to 150 cm, producing 90–175 g/plant. It thrives under stable temperatures, responds well to organic nutrients, and develops a healthy green canopy, making it rewarding for growers seeking a fast, high-yielding autoflower.
Effects and Flavor of Cherry Pie Automatic
Cherry Pie Automatic offers a balanced high: uplifting and cerebral from its sativa heritage, yet physically calming from its indica side. With 19% THC, it’s ideal for daytime focus or evening relaxation. Its flavor is rich and fruity, blending sweet blueberry, ripe fruit, and candy notes. Smooth and aromatic, it delivers a pleasurable smoking experience, making it as enjoyable to taste as it is to grow.