

Included FREE items


 Cannabis Grow guide by Royal Queen Seeds
- Growing cannabis step by step
- Cannabis growing basics
- Choosing your seeds
- How to germinate seeds
- The cannabis vegetative stage
- The cannabis flowering stage
- Harvesting cannabis
- Trimming, drying, and curing
- Choosing pots and soil
-
Growing indoors
- A Complete Overview Of Growing Cannabis Indoors
- Cannabis Cultivation Tips: How To Set Up Indoor Grow Lights
- How Many Cannabis Plants Can You Grow Per Square Metre?
- Indoor Cannabis Growing: Relative Humidity and Temperatures
- Hydroponics Cannabis Growing Guide (with diagrams)
- Cannabis Micro Growing: Growing Great Weed in Tiny Spaces
- Growing outdoors
- How to grow autoflowering cannabis
- Cannabis nutrients and pH
- Cannabis troubleshooting: Nutrients
-
Cannabis troubleshooting: Growing
- Cannabis Seed Germination — Troubleshooting Guide
- How to Deal With Pythium (Root Rot) in Cannabis Plants
- Slow Cannabis Plant Growth And What You Can Do About It
- How to Prevent and Fix Stretching in Cannabis Seedlings
- Watering Your Cannabis: How To Fix Over And Underwatering
- Understanding Male, Female, And Hermaphrodite Cannabis
- Identifying and Treating Common Cannabis Ailments
- How To Revive a Sick Cannabis Plant
- How to Avoid Mouldy Weed During Drying and Curing
- How to Prevent and Treat Dry and Crispy Cannabis Leaves
- What Cannabis Leaves Can Tell You
- Yellow Cannabis Leaves
-
Cannabis Strains Grow Report
- HulkBerry Automatic Grow Report
- Blue Cheese Auto Grow Report
- Purple Punch Automatic Grow Report
- Triple G Automatic Grow Report
- Do-Si-Dos Automatic Grow Report
- Green Gelato Automatic Grow Report
- Haze Berry Automatic Grow Report
- Purple Queen Automatic Grow Report
- Cookies Gelato Automatic Grow Report
- Sherbet Queen Automatic Grow Report
- Sweet Skunk Automatic Grow Report
- Medusa F1 Grow Report
- Cannabis plant training
-
Weed growing tips
- The Cannabis Plant Anatomy
- How to preserve seeds
- How Much Sunlight Do Outdoor Cannabis Plants Need To Grow?
- How to Control and Prevent Stretching in Cannabis Plants
- How And When To Transplant Your Cannabis Plants
- My Cannabis Plants Are Growing Too Tall: What Should I Do?
- Should You Worry About Purple Or Red Cannabis Stems?
- What To Do When Your Indoor Cannabis Won’t Flower
- How To Protect Your Cannabis Plants From Heat Stress
- How To Tell If Your Female Cannabis Plant Has Been Pollinated
- Growing Medical Marijuana
- Bud Washing: How to Clean Your Weed
A Guide To The Final Weeks Of The Cannabis Flowering Stage
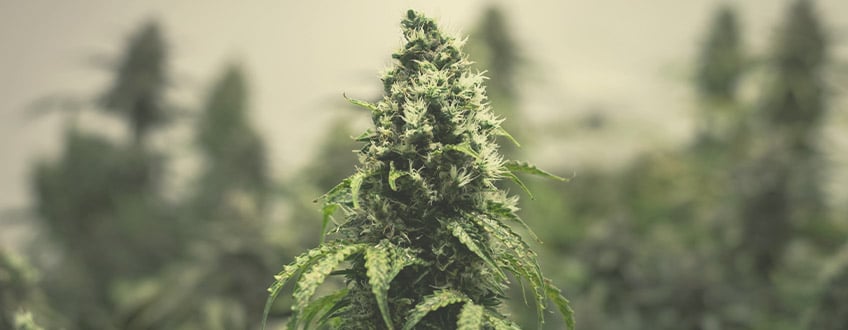
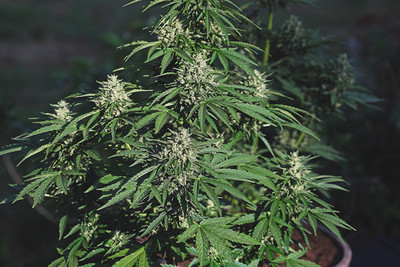
After weeks of mounting excitement, the long-awaited moment for harvest is finally within arm's reach. Plants have moved quickly through their first three weeks of flowering, undergoing a real transformation. White pistils have emerged, forming the foundation for the buds over which you have been drooling in anticipation.
After flowering for around five weeks, there are now solid cannabinoid-dripping buds found on your plants, which are still growing and expanding—but the biggest part of their development is already behind them. Your flowering plants should still be lovely and green as your plants are firing up their THC production on all cylinders. The leaves around the buds are also becoming stickier, and the many THC-rich trichomes produced on them will later be used for making a nice lump of hash.
As harvest is just around the corner, it’s good to keep any fan leaves you trim from your plants as they too contain THC and can be later used to make hash or kief. More about this in our harvest section.
Using Bloom Boosters
As long as you have taken good care of your plants, watering them well and not administering too many nutes, the very sight of your garden should be enough to get your mouth watering. No matter if you’re growing indoors under a grow light or outside under the sun, the many resin glands all over your plant sparkle as they dance in the light.
Flowering cannabis plants have additional demands for phosphorus and potassium, so it’s worth giving them PK 13/14 as extra stimulation for flower development. These substances are found in every basic nutrient mix, but in lower volumes. With some additional PK 13/14, you can get denser and more compact buds. If you are new to growing, it can be best to start with basic cannabis nutrients with NPK (nitrogen, phosphorus and potassium), plus a PK 13/14 additive for flowering and a root stimulator.
With these basic products, you will be able to grow yourself a great harvest. If plants are healthy, then you can apply a number of additional products like a bloom stimulator and/or boosters and enzymes. If your plants are struggling, however, it doesn’t make much sense to add these often-expensive products as they can only help as long as everything else is going smoothly. As newcomers tend to make mistakes, these products will in all likelihood be overkill and are not really necessary.
Enzymes take care of reducing the salt accumulation in your soil that can come from feeding additional nutrients. After using the same bottle of nutrients for a while, you will sometimes notice a white, crystalline deposit on top of it. These are the same salts that also accumulate in your container over time. By growing with organic nutrients, you can reduce the accumulation of these salts, as these contain considerably lower levels than mineral nutrients.
Bloom Boosters: Pros & Cons
Pros
- Can benefit bud development
- Can maximise yield
- Can benefit potency and taste

Cons
- Not very useful for new cannabis growers
- Not needed if you’re already using good basic cannabis nutrients
- Can increase the chance of overfeeding
- Added expenses


CALCULATING BLOOM PERIOD USING POT SIZE
The ideal pot size will depend on how many plants you are growing and the number of days/weeks of veg you give them. These two factors are often linked to each other: If you have a larger number of plants to pack in a small room, then you need to use smaller pots and give the plants less time in growth. For example, if you have 16 plants in one square metre and give them a veg period of between 5 and 9 days, the plants will be happy with 5 litre pots.
If you were to reduce that number to 10 plants and allow them a somewhat longer growth period of 10–14 days, then the plants will need 7–11 litre pots. The fewer plants you grow, the larger the pots you can use and the longer you can give them for growth. Ultimately, yields will end up more or less the same whichever method you use. The only difference is in the amount of time needed to reach harvest.
Someone with 16 plants with a common flowering time of 8 weeks will need about two months and five days from start to finish.
If you have 10 plants, then it will take you about two months and two weeks. In other words, it will take you longer to get the same yield. Commercial growers in particular find it important to get to harvest in the shortest time possible. That is why they often cram 20 plants in a square metre and only give them 1–3 days for veg, depending on the medium they are using. This way, they can harvest every two months if they use a strain that does the business in 8 weeks. In general, plants with more of a sativa influence take longer to bloom than those dominated by indica genes.
Your selection of cannabis seeds could be guided by their required flowering time, as well as other factors such as their taste or effect. If you prefer a more "up" high rather than a heavy body stone, you will likely want a sativa-dominant cross that takes a little longer to bloom, typically between 8–12 weeks. Even so, do not forget that every plant is unique. There can always be early-blooming, medium-long-blooming, and late-blooming individuals in your cannabis garden, even from the same strain and the same seeds.
If you read somewhere that a particular variety is "very uniform", this means that there will be little difference in harvest time among the same batch of cultivars. In this case, you can expect 80% of plants to end up finishing around the same time. But there are also strains with less uniformity and larger differences in flowering time. You should take this into account when choosing a particular cannabis variety.
Climate Control
Flowering cannabis plants require a specific set of climatic conditions to thrive. No matter the stage of growth, cannabis needs good ventilation to ensure robust health. In terms of humidity, flowering plants need significantly less moisture in the air than seedlings or early vegetating plants.
Ideal Humidity
For the flowering stage, you should aim for a relative humidity of around 40–55%. The easiest way to achieve this, without getting an air humidifier, is to attach a dimmer switch to your exhaust fans. With a dimmer, you can vary the speed of the air extraction and therefore influence the climate in your grow room. Moreover, an exhaust without a dimmer always operates at full speed even if it isn’t needed. This will not only waste electricity, but also creates more noise than necessary.
With a simple dimmer, you can set up your exhaust to suck away less moist air during the first few weeks of vegetative growth so your young plants develop more quickly. As soon as the plants become bigger, you can let the exhaust do a bit more work as they start to produce more moisture. In fact, once your plants are in full bloom around the fourth week of flowering, you should make sure your plants receive no more than the 50–55% RH threshold.


Checking For Mould
Too high humidity in the last few weeks of growth can lead to the development of mould and mildew on your buds. This is because the moisture gets trapped within, creating an ideal breeding ground for a host of pathogens. It’s worth noting that strains that develop particularly hard buds have a greater risk of developing mould than those with an airier structure.
Once you’ve spotted mould on a bud, you can consider it lost, as the mould has long been wreaking havoc inside before it became visible on the exterior. When you have a well-developed bud and you see an odd, yellow-coloured sugar leaf sticking out from the middle, you are best off carefully pulling it out. If the leaf comes free easily, it is likely the bud is infected. So, you better make sure that you have good airflow around your plants in the last weeks of flowering. When in doubt, invest in a dehumidifier.
Ventilation
Aside from humidity level, moving air in general makes a big difference in the health of your plants. An exhaust system or a stand fan not only ensure that warm, damp air is removed, but can also make sure that fresh, CO₂-rich air is sucked into the space. They will need this fresh air to keep growing and blooming at an optimal rate. If you grow in a cupboard or a similar small space, you may not even have room for a fan, but can at least keep the door ajar to allow for some fresh air exchange.
With your exhaust connected to a dimmer, you can master the environment in your grow room much better for larger yields and a top-quality harvest.

Tips On Keeping Your Noise Level Down
If you are growing indoors, noise from your exhaust fans could be a problem. But no worries, there are a number of ways you can reduce this. As we already mentioned, the first thing you can do is get a dimmer to control the speed (and therefore noise) of your fans. Simply reducing them to 75–80% can make a big difference.
This also means that it’s always better to go with an exhaust that has a somewhat higher capacity than one with too little. If you have a large exhaust, you can just dim it down to half the speed so it won’t make much noise. If this doesn’t help, you can also try to put your fans inside an insulated box. When you connect a length of pipe to the fan, this can make a big difference as the sound is not immediately dispersed, but first runs along the pipe.
If all of these things still don’t help to keep the noise down, you can also fit a sound muffler to your fan. They look similar to a carbon filter, with a metal tube that you attach to your fan. You can then just fit a normal duct pipe to the muffler and should finally be able to enjoy greatly reduced noise.
The Final 2 Weeks Of Flowering
If you grow strains with an average flowering time, the majority of bud development will occur by the 6th week of bloom. In the last two weeks, the buds will mostly be ripening and not really growing much more in size. At this point, the previously white pistils on the buds will now slowly turn amber-brown. Depending on the strain you are growing, as well as environmental factors, the ripening of the buds can take a variable amount of time to finish.
Checking Pistils And Trichomes
One way to get an idea of when to harvest is by inspecting the pistils. Once around 80% have moved from white to brown, it’s likely that your weed is ready for the chop. keep in mind, however, that other factors can influence the browning of pistils, so if you desire more accuracy, consider the trichome test. Checking the trichomes is the most surefire way to know when it’s time to harvest.

Trichomes are the tiny, sticky, crystal-like outgrowths on the buds and leaves that produce the good stuff from cannabis such as cannabinoids and terpenes. Trichomes are tiny, so you need a loupe or a microscope to see them. They look like mini mushrooms with a tiny bubble head on a stem.
As your cannabis is flowering, these trichomes change colour, moving from crystal clear to milky-white, and then finally to an amber colour. If the tiny “mushroom” heads are all still crystal clear, then there is still a ways to go. By the time most of the trichomes have turned a milky white colour, your cannabis should be just about ready. But know that when you choose to harvest can also affect the resulting high. Harvesting when trichomes are mostly milky, with just a few amber heads, usually results in more of an “upper high”. Wait for more amber heads to appear, and the effect will become more sedative. Many cultivators choose to harvest when around 15% of the trichomes have turned amber and the rest are milky-white.


Ending Nutrient Cycle / Flushing
At the end of flowering, there may still be plenty of nutrients left in the growing medium and leaves. To prevent harsh tastes and unsavoury chemicals making their way into your stash, you can simply stop feeding any nutrients in the last 1.5–2 weeks of flowering. If you are growing hydroponically, you shouldn’t stop feeding until the last five days as they will be growing in water only. But when you are growing in pots with soil or coco, there can be lots of nutrients left that we want the plants to use up.
Once you stop feeding, your cannabis plants will take up whatever nutrients remain in the growing medium. Then, they will start to suck their leaves dry to get the nutrients out from these as well. This is why your cannabis plant will turn yellow in late flowering. Not needing to feed your plant in the last couple weeks provides an extra perk—it saves you money on nutrient expenses.
During this two-week period, you can periodically flush your medium with pure, pH-balanced water to get rid of any mineral deposits lingering in the soil. Make sure to drench the soil to full capacity so it picks up the nutrients, then drench it again and let it all drain out the bottom for a couple minutes. However, be sure not to water too frequently, as you don’t want to hurt your plant in its home stretch to harvest.

Trimming
When leaves turn yellow in late flowering, you don’t need to worry that something is wrong, as this is entirely normal. It is actually a good sign, as it shows your plants are using up any excess nutrients.
Some growers trim their plants slowly over the last weeks or days before harvest, removing some of the larger leaves to allow more light to reach the lower buds. As yellow leaves will normally shrivel and autumn off on their own, this can save you some trimming work. Otherwise, in this late stage of flowering, feel free to trim off any yellowing leaves as they have fulfiled their purpose. This will also make it easier to harvest.
Happy growing!


Grow Cannabis With RQS
.jpg)


 Grow Guide Topic Finder
- Growing cannabis step by step
- Cannabis growing basics
- Choosing your seeds
- How to germinate seeds
- The cannabis vegetative stage
- The cannabis flowering stage
- Harvesting cannabis
- Trimming, drying, and curing
- Choosing pots and soil
-
Growing indoors
- A Complete Overview Of Growing Cannabis Indoors
- Cannabis Cultivation Tips: How To Set Up Indoor Grow Lights
- How Many Cannabis Plants Can You Grow Per Square Metre?
- Indoor Cannabis Growing: Relative Humidity and Temperatures
- Hydroponics Cannabis Growing Guide (with diagrams)
- Cannabis Micro Growing: Growing Great Weed in Tiny Spaces
- Growing outdoors
- How to grow autoflowering cannabis
- Cannabis nutrients and pH
- Cannabis troubleshooting: Nutrients
-
Cannabis troubleshooting: Growing
- Cannabis Seed Germination — Troubleshooting Guide
- How to Deal With Pythium (Root Rot) in Cannabis Plants
- Slow Cannabis Plant Growth And What You Can Do About It
- How to Prevent and Fix Stretching in Cannabis Seedlings
- Watering Your Cannabis: How To Fix Over And Underwatering
- Understanding Male, Female, And Hermaphrodite Cannabis
- Identifying and Treating Common Cannabis Ailments
- How To Revive a Sick Cannabis Plant
- How to Avoid Mouldy Weed During Drying and Curing
- How to Prevent and Treat Dry and Crispy Cannabis Leaves
- What Cannabis Leaves Can Tell You
- Yellow Cannabis Leaves
-
Cannabis Strains Grow Report
- HulkBerry Automatic Grow Report
- Blue Cheese Auto Grow Report
- Purple Punch Automatic Grow Report
- Triple G Automatic Grow Report
- Do-Si-Dos Automatic Grow Report
- Green Gelato Automatic Grow Report
- Haze Berry Automatic Grow Report
- Purple Queen Automatic Grow Report
- Cookies Gelato Automatic Grow Report
- Sherbet Queen Automatic Grow Report
- Sweet Skunk Automatic Grow Report
- Medusa F1 Grow Report
- Cannabis plant training
-
Weed growing tips
- The Cannabis Plant Anatomy
- How to preserve seeds
- How Much Sunlight Do Outdoor Cannabis Plants Need To Grow?
- How to Control and Prevent Stretching in Cannabis Plants
- How And When To Transplant Your Cannabis Plants
- My Cannabis Plants Are Growing Too Tall: What Should I Do?
- Should You Worry About Purple Or Red Cannabis Stems?
- What To Do When Your Indoor Cannabis Won’t Flower
- How To Protect Your Cannabis Plants From Heat Stress
- How To Tell If Your Female Cannabis Plant Has Been Pollinated
- Growing Medical Marijuana
- Bud Washing: How to Clean Your Weed
Categories

Grow Cannabis With RQS


