Included FREE items


How To Revive a Sick Cannabis Plant
- Growing cannabis step by step
- Cannabis growing basics
- Choosing your seeds
- How to germinate seeds
- The cannabis vegetative stage
- The cannabis flowering stage
- Harvesting cannabis
- Trimming, drying, and curing
- Choosing pots and soil
-
Growing indoors
- A Complete Overview Of Growing Cannabis Indoors
- Cannabis Cultivation Tips: How To Set Up Indoor Grow Lights
- How Many Cannabis Plants Can You Grow Per Square Metre?
- Indoor Cannabis Growing: Relative Humidity and Temperatures
- Hydroponics Cannabis Growing Guide (with diagrams)
- Cannabis Micro Growing: Growing Great Weed in Tiny Spaces
- Growing outdoors
- How to grow autoflowering cannabis
- Cannabis nutrients and pH
- Cannabis troubleshooting: Nutrients
-
Cannabis troubleshooting: Growing
- Cannabis Seed Germination — Troubleshooting Guide
- How to Deal With Pythium (Root Rot) in Cannabis Plants
- Slow Cannabis Plant Growth And What You Can Do About It
- How to Prevent and Fix Stretching in Cannabis Seedlings
- Watering Your Cannabis: How To Fix Over And Underwatering
- Understanding Male, Female, And Hermaphrodite Cannabis
- Identifying and Treating Common Cannabis Ailments
- How To Revive a Sick Cannabis Plant
- How to Avoid Mouldy Weed During Drying and Curing
- How to Prevent and Treat Dry and Crispy Cannabis Leaves
- What Cannabis Leaves Can Tell You
- Yellow Cannabis Leaves
-
Cannabis Strains Grow Report
- HulkBerry Automatic Grow Report
- Blue Cheese Auto Grow Report
- Purple Punch Automatic Grow Report
- Triple G Automatic Grow Report
- Do-Si-Dos Automatic Grow Report
- Green Gelato Automatic Grow Report
- Haze Berry Automatic Grow Report
- Purple Queen Automatic Grow Report
- Cookies Gelato Automatic Grow Report
- Sherbet Queen Automatic Grow Report
- Sweet Skunk Automatic Grow Report
- Medusa F1 Grow Report
- Cannabis plant training
-
Weed growing tips
- The Cannabis Plant Anatomy
- How to preserve seeds
- How Much Sunlight Do Outdoor Cannabis Plants Need To Grow?
- How to Control and Prevent Stretching in Cannabis Plants
- How And When To Transplant Your Cannabis Plants
- My Cannabis Plants Are Growing Too Tall: What Should I Do?
- Should You Worry About Purple Or Red Cannabis Stems?
- What To Do When Your Indoor Cannabis Won’t Flower
- How To Protect Your Cannabis Plants From Heat Stress
- How To Tell If Your Female Cannabis Plant Has Been Pollinated
- Growing Medical Marijuana
- Bud Washing: How to Clean Your Weed
Contents:
- Bring your dying weed plant back to life
- Step 1: analise symptoms
- Step 2: analise your watering schedule
- Step 3: analise your feeding
- Step 4: analise your growing medium
- Step 5: analise your environment
- Step 6: analise your setup
- Step 7: inspect your plants for pests
- Step 8: give your plants key nutrients and supplements
- Weed plants look sick? have some hope!
You started out growing weed with high hopes. Now, one of your plants is looking a little bit worse for wear. You might be asking yourself, "Why is my weed plant dying?".
So, what should you do about it? First things first—don't panic! Running into obstacles is an inevitable part of growing cannabis. After calming your mind and accepting the situation, it’s time to make things right. There are a host of reasons your marijuana plant might look a bit ill, and each problem has a unique solution. Below, we’ll walk you through exactly how to revive a weed plant, focusing on 8 crucial steps.
Bring Your Dying Weed Plant Back to Life
In order to determine what made your plant sick in the first place, and to remedy the issue, we recommend keeping a cannabis journal. Recording your observations can really help you hit the nail on the head in terms of connecting symptoms to their causes and solutions. Use this handy tool to record the growth and behaviour of your plant as the weeks go by, as well as any symptoms you come across, any pests you see, and any deficiencies you may suspect.
With that said, we’ll proceed to take you through a list of steps to identifying and reviving a sick marijuana plant. By the end of this guide, you’ll be equipped with everything you need to know to revive sick plants.
Step 1: Analise Symptoms
Sick or stressed cannabis plants display a wide range of symptoms.
The speed in which the symptoms occur is already symptomatic. Are they occurring overnight, or it is something build in time?
Below are some of the primary symptoms that sick cannabis plants display, as well as quick and simple ways to remedy them.
-
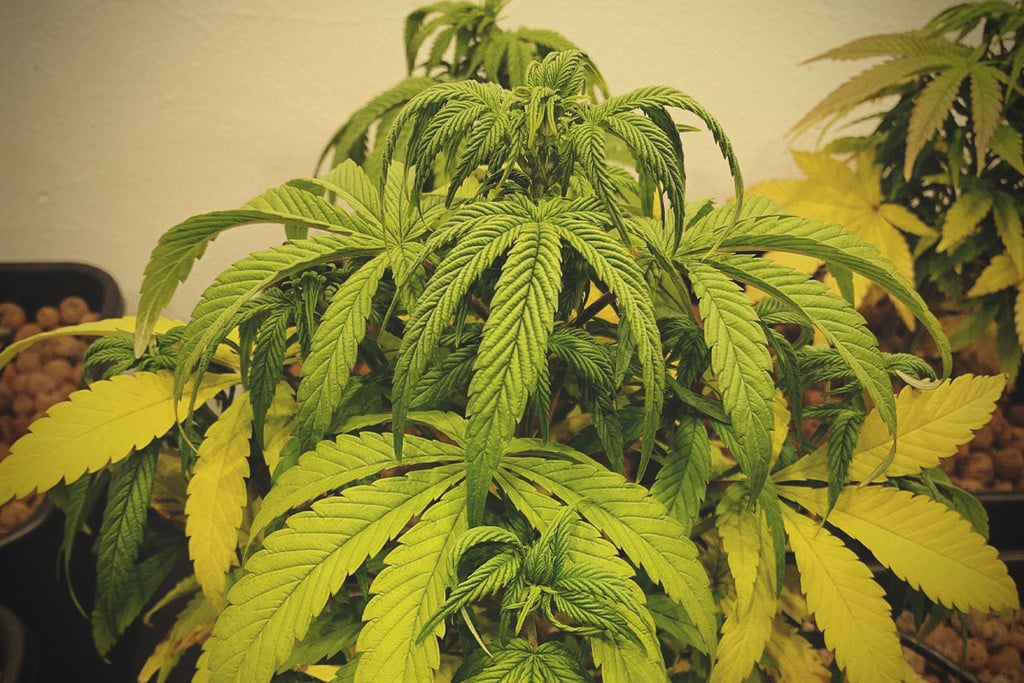
Yellow Leaves
Yellow leaves can arise for a variety of reasons, such as issues with watering, nutrients, and lighting.
Overwatering
Novice growers tend to care for their plants a little too much. In an attempt to cater for their every need, they water too often, oversaturating the medium each time. This can suffocate the roots and make them susceptible to pathogens such as root rot.

Underwatering
The opposite of the above, underwatering results mainly from neglect. Plants usually get too dry when growers go on holiday or a heatwave strikes. In extremely hot conditions, missing a day or two of watering can seriously impact a plant’s vitality.

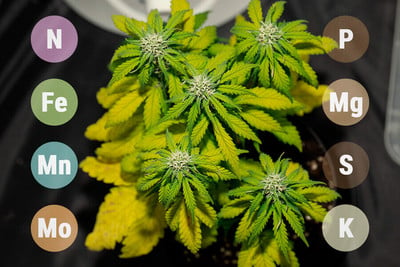
Nitrogen Deficiency
This essential macronutrient serves as a key component of amino acids (the building blocks of proteins) and an important part of the chlorophyll molecule—the pigment that makes photosynthesis possible. A lack of this key molecule from poor fertilisation results in nitrogen deficiency and subsequent yellowing of the leaves. This unsightly colour begins lower down and moves up the plant.
Luckily, there are plenty of sources of nitrogen to choose from. Start off by applying a liquid seaweed foliar spray according to the product instructions. Going forward, apply Easy Grow Booster Tablets for a balanced source of nutrients throughout the vegetative phase.

Nutrient Burn
Nutrient burn stems from overfeeding cannabis plants. While a lack of nutrients can cause deficiencies, too much applied all at once creates a toxic effect that results in extremely dark-green leaves that develop yellow and brown tips.
This problem arises when growers mix their nutrients stronger than recommended, or apply unrotted “hot” compost onto their outdoor beds.
To fix nutrient burn, you’ll need to flush your soil immediately using clean, pH-balanced water. Proceed to restrict nutrients until symptoms resolve to force your plants to use up the excess. Then, you’ll need to reevaluate your feeding schedule. Follow the product instructions accurately to avoid repeating the same mistake. If they got you into this mess in the first place, start out by halving the recommended values.


-
Stretching
Stretching can cause cannabis plants to become structurally weak and places them at risk of toppling over. While some strains naturally stretch more than others, this symptom mostly stems from environmental factors. If your seedlings are becoming “leggy” or your vegging plants are starting to stretch excessively, chances are you simply need to reposition your lights.
A lack of exposure causes plants to reach out toward the available light source in an act of desperation.
Excessive heat can also cause seedlings to become too lanky. Place a thermo-hygrometer in your growing room—a useful growing tool that measures both temperature and humidity. You want to aim for daytime temperatures of 19–20°C and 13°C at night. Use fans to regulate this, or air conditioning units in more extreme environments.
Keep in mind that most cannabis plants go through a “flowering stretch” in the early weeks of bloom, wherein they gain significant size. This in itself is not a bad thing, but plants that are already leggy during late veg can be at greater risk of toppling once they enter bloom. So have support structures ready if need be.
-
Stunted Growth
Stunted growth can make plants appear sickly and also impact yields. Several variables can cause growth to come to a halt. Here’s a quick fix for each one:
| Lack of nutrients | You’ll also see other signs of nutrient deficiencies. Apply regular doses of Easy Boost and add mycorrhizal fungi as a root drench. |
| Calcium deficiency | A deficiency in this nutrient, in particular, can cause stunted growth. You’ll also notice discoloured young shoots and curled new growth. Apply a Cal-Mag supplement according to the product instructions. |
| Lack of light | Aim for a light cycle of 18 hours on and 6 hours off during the vegetative phase. Make sure your indoor grow lights are set up correctly. |
| Transplant stress | Minimise the amount of times you transplant during the growing cycle. Ideally, transplant healthy seedlings directly into their final, roomy containers. |


-
Underdeveloped Buds
Also known as “popcorn buds”, these small, airy, underdeveloped flowers aren’t exactly impressive. Use the tips below to avoid, and reverse the likelihood of, popcorn buds in the first place:
| Defoliate | Defoliating your flowers increases light and air exposure to buds that would otherwise become overshadowed by a dense canopy. |
| Feed well | Keep your plants well-fed with a formula containing high levels of phosphorus and potassium specifically designed for the flowering stage, such as Easy Bloom Booster Tablets. |
| Deter pests | The stress induced by pests can cause poor-quality buds to form. Use biological control techniques to keep pest pressure to a minimum. |


-
Leaves Turning Upward
Have you noticed the leaves turning upward on your cannabis plants? Some growers refer to this condition as “canoeing”, as the leaves take on the concave appearance of these old-school watercraft.
Conditions that are too hot or too cold can cause leaves to turn upward and a slower growth. Aim for temperatures of 22–28°C during veg and 20–26°C during flowering.


-
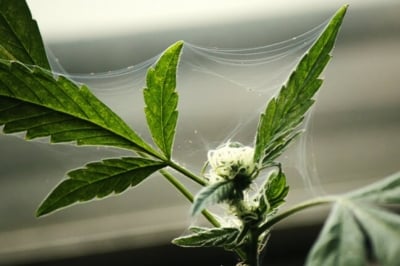
White Powdery Patches
White powdery patches on fan and sugar leaves indicate the presence of powdery mildew, a fungal disease that can damage plants in the latter stages of infestation. The symptoms of this pathogen include stunted growth, distorted leaves, and infection of newly formed tissues. To take out this mould before things get out of hand, you can consider the following options:
- Regularly wipe down leaves with a wet paper towel
- Apply a neem foliar spray
- Mix 1 tablespoon of baking soda into 4.5 litres of water and apply the solution as a foliar spray


Step 2: Analise Your Watering Schedule
While both of these states can make your plants appear on the verge of death, there are several things you can do to revive them.
-
Keep Tabs on Your Journal
First and foremost, using a cannabis growing journal can help you keep track of your watering schedule. By noting down when you last watered and how much you administered, you’ll get a good idea of how much they tolerate. If your plants develop symptoms of overwatering or underwatering, you need to adjust how much, or how frequently, you water them.
-
How To Revive an Overwatered Plant
The main symptoms of overwatering include:
| Drooping leaves | Slowed growth | Yellow leaves |
| Drooping leaves | Slowed growth | ||||||
| Yellow leaves | |||||||
|---|---|---|---|---|---|---|---|
Start by improving drainage in any way possible. Remove your container from any saucers filled with pooling water. Place them on a layer of gravel or clay pebbles to help the excess drain from the bottom of the pot.
Next, stop watering your plants as often! Refer to your journal to see where you went wrong. Note in your journal how long it usually takes to reach this state in your environment.
You can also weigh your potted plants when they’re completely dry versus completely saturated, and then use this information to gauge how saturated your pots are at any given time. Note these figures in your journal and refer to them to determine when it’s time to water again.


-
How To Revive an Underwatered Plant
Underwatered plants take on a pretty sickly appearance, but you can easily revive them if you catch it early enough. Look out for these key symptoms:
| Extremely dry soil | Wilting leaves | Crispy, dry leaves |
| Extremely dry soil | Wilting leaves | ||||||
| Crispy, dry leaves | |||||||
|---|---|---|---|---|---|---|---|
Again, the fix here is fairly obvious: your plants need more water! Check your journal, and pen in a couple more watering sessions across the week. Start by saturating the entire growing medium so that around 15% of the water drains out of the bottom. And then follow the “finger test” going forward to dial in your timing. If you can’t find time to keep up with watering, consider drip irrigation to keep them consistently hydrated.
If your plants continue to suffer from underwatering, you need to reconsider the size of your pots. Mature plants in undersized pots quickly suck up all of the water. If this keeps happening, transplant up to a larger container size.


Step 3: Analise Your Feeding
Cannabis plants need certain amounts of macronutrients and micronutrients to survive and thrive. However, tipping the scale too far in either direction can result in deficiency or toxicity. If you suspect the symptoms of either of these conditions, you’ll need to evaluate your feeding schedule.
-
Check in With Your Journal
If you’ve used a journal up to this point, you can simply open up the pages and look back at your previous feeding times and quantities. Have you recorded any changes in your feeding schedule? Did you miss a session?

-
Double-Check NPK Ratio
If your schedule looks normal, you should check in on the product you’re using to make sure it fits the demands of your plant. Cannabis needs an array of nutrients to stay healthy, but it depends on the macronutrients—nitrogen, phosphorus, and potassium (NPK)—for the lion’s share of its nutrition.
Weed plants require a different balance of macronutrients during different stages of the growing cycle. They need higher quantities of nitrogen to fuel leafy growth during the vegetative phase, and higher quantities of phosphorus and potassium to establish and develop flowers.
However, symptoms of deficiencies can occur even when you’re feeding your plants all of the right nutrients. A condition called nutrient lockout occurs when the soil pH becomes too acidic or alkaline and the roots are unable to uptake critical nutrients.
The symptoms of nutrient lockout look similar to those of a normal deficiency. Plants take on a yellow and brown look, and their leaves may curl up. Determining the cause of the problem requires a pH tester. Use this device to test a sample of your soil, and use a pH-adjusting product to bring the value to between 6.0–6.5.
-
How To Remedy Over-Fertilisation
Feeding your plant too much fertiliser can result in nutrient burn. Because nitrogen is a primary nutrient in most products, nutrient burn often takes the form of nitrogen toxicity. The main symptoms of this condition include:
| Extremely dark green leaves | Bent leaf tips | Deep red or purple stalks and branches | Calyx tips die back |
| Extremely dark green leaves | Bent leaf tips |
| Deep red or purple stalks and branches | Calyx tips die back |
The first port of call is to immediately dial back on feeding. Proceed to flush your growing medium with pH-balanced water to remove some of the excess salts. Follow this up with an enzymatic line cleaner. Going forward, we recommend using a TDS meter to measure the parts per million (PPM) of your solution’s runoff to ensure you aren’t overfeeding.


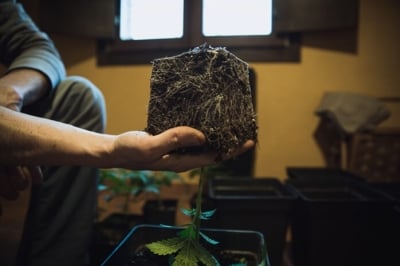
Step 4: Analise Your Growing Medium
If your plants look sick, you should take a good look at their growing medium. The symptoms of nutrient deficiencies and overwatering can indeed result from poor soil.
Some soils and compost are formulated for specific species of plants. Make sure you didn’t accidentally pick up a bag of this acidic growing material!
Some composts and topsoils are just plain bad. Those that are too compact make it hard for the roots to penetrate down and expand. They also reduce drainage and aeration and increase the odds of fungal infection. If your compost seems too compact, consider potting up into a superior soil blend.
If you're potting on a photoperiod strain in an attempt to revive it, create your own super soil to bring it back to life. You’ll need to take a different approach if you’re working with an autoflowering variety. These strains prefer less feed. Use our autoflowering potting soil recipe, which contains a perfect mix of peat moss, compost, perlite, and vermiculite.
If you have room in your garden, composting serves as an excellent way to reuse garden waste and kitchen scraps. Turn these materials into nutrient-rich soil over several months to boost the fertility in your growing space. If you don’t have a garden, you can set up a small worm bin under your sink to transform your food scraps, tea bags, and eggshells into worm castings, and apply them as a nourishing top dressing to plants struggling with deficiencies.
-
Beware Aminopyralid
You picked up the best compost you could find. It has a perfect NPK ratio for the vegetative phase, plenty of organic matter to nourish beneficial microbes, and perlite for improved structure. However, your plant still looks sick. If you’ve checked the pH and are sure that you’re watering and feeding correctly, you could be dealing with a hidden enemy.
Aminopyralid, known more simply as AP, causes thousands of gardeners grief every year. This herbicide makes its way through the digestive tract of cows and horses, and often contaminates compost supplies. If your plants look yellow, stunted, and the young foliage appears distorted, it’s most likely AP.
Try your hardest to avoid this situation by contacting your compost supplier. Ask them where they source their manure from and if they test for AP. Better yet, start building your own compost pile so you don’t have to take the gamble. Thankfully, microbes break down AP after around one year. Plus, the herbicide doesn't affect members of the grass family. Go ahead and plant some sweetcorn, and then use it as normal next season.


Step 5: Analise Your Environment
Several environmental factors dictate plant health. Cannabis plants thrive within a specific temperature and humidity window. When these factors fluctuate, plants can start to look sick and unproductive. You can use a digital thermo-hygrometer in your growing space to measure temperature and humidity simultaneously.
-
Humidity
Relative humidity (RH) refers to the amount of water present in the air at a certain temperature. Fungal diseases thrive when humidity levels get too high, and they’re especially fond of the wet and sticky environment of cannabis flowers. To avoid these diseases, and the symptoms that accompany them, aim for the following RH levels:
| Seedlings and clones: 65–70% | Vegetative stage: 40–70% | Flowering stage: 40–50% |
| Seedlings and clones: 65–70% |
| Vegetative stage: 40–70% |
| Flowering stage: 40–50% |
You can control humidity indoors using fans, ventilation, and humidifiers/dehumidifiers. While you can’t control the weather outdoors, you can regulate humidity in greenhouses and polytunnels using the same indoor techniques.
-
Temperature
Cannabis plants also do best when growing within a certain temperature range. Conditions that are too hot or too cold can cause them to become stressed and stunted. Aim for the following daytime temperatures:
| Seedling and clones: 20–25°C | Vegetative stage: 22–28°C | Flowering stage: 20–26°C |
| Seedling and clones: 20–25°C |
| Vegetative stage: 22–28°C |
| Flowering stage: 20–26°C |
-
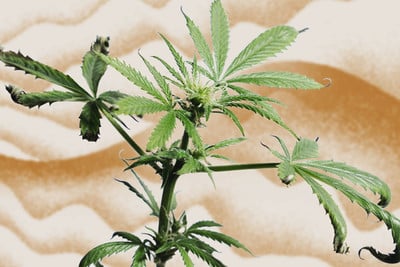
Will Plants Recover From Heat Stress?
Cannabis plants become considerably stressed when exposed to high temperatures for long periods. The symptoms of heat stress include stunted growth, a dry and withered appearance and/or curled leaves. You can rescue your stressed plants and regulate the temperature in your growing space using the following methods:
- Place oscillating fans in your growing space
- Instal an air conditioning unit
- Instal an exhaust system
- Move your plants outdoors to a fresher spot, with a better breeze of air.
If you want to remove any extra work, you can rig up fans or air conditioning to a temperature sensor to automate temperature regulation.


Step 6: Analise Your Setup
You may also need to tweak a few things about your setup to rescue a sick-looking plant. Check out two of the most common equipment pitfalls below.
-
Lights
Cannabis plants need light to create energy, and they vastly underperform when deprived of adequate exposure. Stretchy and spindly plants are likely not receiving enough light. In addition to maintaining the adequate distance from the source (30–70cm for 200–400W LEDs, and 50–80cm for 450–600W LEDs), you need to consider how many plants you can feasibly grow with your setup.
| 120W ≈ 0.5m² ≈ 1 plant | 200W ≈ 0.8m² ≈ 2 plants | 280W ≈ 1m² ≈ 4 plants | 350W ≈ 1.5m² ≈ 6–8 plants |
| 120W ≈ 0.5m² ≈ 1 plant |
| 200W ≈ 0.8m² ≈ 2 plants |
| 280W ≈ 1m² ≈ 4 plants |
| 350W ≈ 1.5m² ≈ 6–8 plants |
Revegetation
Sometimes, too much light can cause issues. Photoperiod plants require a dark cycle of 12 hours or less to trick them into thinking the seasons are changing. If they’re exposed to light leaks, flowering plants can switch back into veg mode—a sight that causes a lot of growers to freak out. Because accidental revegging can negatively impact yields and stress plants, you need to prevent it from occurring by patching up your tent and covering up any leak points.
-
Pot Size
Pot size can limit the potential of a cannabis plant. Smaller pots mean smaller plants. Also, a smaller pot dramatically increases the chances of underwatering, as there's not enough medium to hold adequate moisture. If your plant looks unhappy, you can help to revive it by simply potting it up into a bigger home.


Step 7: Inspect Your Plants for Pests
Of course, pests are one of the primary reasons cannabis plants start to look sick. The symptoms of a pest infestation can vary greatly, from holes in leaves to yellowing and wilting.
-
Aphids
Aphids are common cannabis pests that suck sap from foliage and multiply rapidly.


| Symptoms |
|
| Solutions |
|
| Symptoms |
|
| Solutions |
|
-
Leaf Miners
Leaf miners are tiny critters that tunnel inside cannabis leaves and eat the inner tissue.


| Symptoms |
|
| Solutions |
|
| Symptoms |
|
| Solutions |
|
-
Fungus Gnats
Fungus gnats are short-lived flies that target the roots of cannabis plants.


| Symptoms |
|
| Solutions |
|
| Symptoms |
|
| Solutions |
|
-
Spider Mites
Spider mites reside on the undersides of leaves, where they puncture plant tissue in order to feed.


| Symptoms |
|
| Solutions |
|
| Symptoms |
|
| Solutions |
|
Step 8: Give Your Plants Key Nutrients and Supplements
Unless your cannabis looks sick from over-fertilisation, applying a range of supplements can help to kickstart development after a period of stunted growth.
| Organic matter | Think compost, manure, worm castings, and mulches. Add these to your soil as slow-release feed for communities of beneficial microbes. |
| Molasses | Cane molasses is a superb source of nutrients for microscopic organisms in the soil. By going out of your way to feed them, you’ll build a stable population that will benefit your plant in return. |
| Enzymes | These microscopic proteins help to catalyse reactions. Applying enzymes to the soil helps to speed up growth, enhance yields, and foster a healthier root system. |
| Mycorrhizal fungi | These species of symbiotic fungi link up to plant roots and help them access nutrients in the soil. They help to prevent plants from getting sick, and can help unfertilised plants bounce back with a vengeance. |
| Rhizobacteria | These root-dwelling species of bacteria help to reduce the chances of root disease and are known to help enhance cannabis yields. |
| Organic matter |
Think compost, manure, worm castings, and mulches. Add these to your soil as slow-release feed for communities of beneficial microbes. |
| Molasses | Cane molasses is a superb source of nutrients for microscopic organisms in the soil. By going out of your way to feed them, you’ll build a stable population that will benefit your plant in return. |
| Enzymes | These microscopic proteins help to catalyse reactions. Applying enzymes to the soil helps to speed up growth, enhance yields, and foster a healthier root system. |
| Mycorrhizal fungi | These species of symbiotic fungi link up to plant roots and help them access nutrients in the soil. They help to prevent plants from getting sick, and can help unfertilised plants bounce back with a vengeance. |
| Rhizobacteria | These root-dwelling species of bacteria help to reduce the chances of root disease and are known to help enhance cannabis yields. |
Weed Plants Look Sick? Have Some Hope!
So, you think your marijuana plant is dying? Worrying will only make it worse! Now you’re equipped with a bunch of knowledge and are more than ready to take on the challenge.
Use the wealth of information above to help revive your sick plants. In doing so, you’ll know exactly how to prevent a similar situation in the future, and handle it with ease if it does arise again. Cannabis growers get very protective over their plants; we understand the feelings of disappointment you might be experiencing. But in reality, a couple of yellow leaves and a bit of curling won’t do much to hamper your harvest!