Included FREE items


How to Cure Your Cannabis Buds
- Growing cannabis step by step
- Cannabis growing basics
- Choosing your seeds
- How to germinate seeds
- The cannabis vegetative stage
- The cannabis flowering stage
- Harvesting cannabis
- Trimming, drying, and curing
- Choosing pots and soil
-
Growing indoors
- A Complete Overview Of Growing Cannabis Indoors
- Cannabis Cultivation Tips: How To Set Up Indoor Grow Lights
- How Many Cannabis Plants Can You Grow Per Square Metre?
- Indoor Cannabis Growing: Relative Humidity and Temperatures
- Hydroponics Cannabis Growing Guide (with diagrams)
- Cannabis Micro Growing: Growing Great Weed in Tiny Spaces
- Growing outdoors
- How to grow autoflowering cannabis
- Cannabis nutrients and pH
- Cannabis troubleshooting: Nutrients
-
Cannabis troubleshooting: Growing
- Cannabis Seed Germination — Troubleshooting Guide
- How to Deal With Pythium (Root Rot) in Cannabis Plants
- Slow Cannabis Plant Growth And What You Can Do About It
- How to Prevent and Fix Stretching in Cannabis Seedlings
- Watering Your Cannabis: How To Fix Over And Underwatering
- Understanding Male, Female, And Hermaphrodite Cannabis
- Identifying and Treating Common Cannabis Ailments
- How To Revive a Sick Cannabis Plant
- How to Avoid Mouldy Weed During Drying and Curing
- How to Prevent and Treat Dry and Crispy Cannabis Leaves
- What Cannabis Leaves Can Tell You
- Yellow Cannabis Leaves
-
Cannabis Strains Grow Report
- HulkBerry Automatic Grow Report
- Blue Cheese Auto Grow Report
- Purple Punch Automatic Grow Report
- Triple G Automatic Grow Report
- Do-Si-Dos Automatic Grow Report
- Green Gelato Automatic Grow Report
- Haze Berry Automatic Grow Report
- Purple Queen Automatic Grow Report
- Cookies Gelato Automatic Grow Report
- Sherbet Queen Automatic Grow Report
- Sweet Skunk Automatic Grow Report
- Medusa F1 Grow Report
- Cannabis plant training
-
Weed growing tips
- The Cannabis Plant Anatomy
- How to preserve seeds
- How Much Sunlight Do Outdoor Cannabis Plants Need To Grow?
- How to Control and Prevent Stretching in Cannabis Plants
- How And When To Transplant Your Cannabis Plants
- My Cannabis Plants Are Growing Too Tall: What Should I Do?
- Should You Worry About Purple Or Red Cannabis Stems?
- What To Do When Your Indoor Cannabis Won’t Flower
- How To Protect Your Cannabis Plants From Heat Stress
- How To Tell If Your Female Cannabis Plant Has Been Pollinated
- Growing Medical Marijuana
- Bud Washing: How to Clean Your Weed
Harvest time might seem like the final stage in the growing process, but that couldn’t be further from the truth. After you’ve harvested the fruits of your labour, it’s time for the most vital steps of them all: drying and curing.
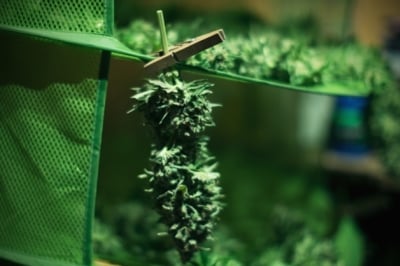
Drying is just as it sounds—it’s the process of removing the majority of the water content from your buds. This will make them easier to handle, more resilient against mould formation, and a lot more pleasant to smoke. Some growers are happy to blaze dried buds, but if you want to take the flavour and potency of your harvest to the next level, you’ll need to cure them.
Contents:
Why Cure Your Cannabis Buds?
Patience is a virtue in all areas of life, and it certainly pays off when curing cannabis. Curing is a prolonged process that can take weeks to complete. It might seem like a hassle at first, but the reality is that curing will turn harsh buds into ones that offer a smooth and delicious smoke. This is because prolonged curing leads to the degradation of byproducts produced by the drying process, such as sugars. These molecules leave a particularly harsh and unpleasant taste in the mouth. Curing banishes these compounds, resulting in a buttery smooth smoke.
Curing also preserves desirable flavours. The molecules that give cannabis strains their intense and unique flavours are known as terpenes. These volatile compounds can degrade easily under high heat, so gentle drying followed by prolonged curing is the way to go for tasty buds.
Taste isn’t the only thing that curing can accomplish. The process can also enhance the high itself. THC, the active psychotropic constituent in cannabis, degrades over time into a cannabinoid known as CBN. CBN is thought to be mildly psychoactive, but is associated with different effects than THC.
Curing will also greatly enhance the shelf life of your harvest and further minimise cases of mould. If cured and stored correctly, your buds can last for a year or longer without any decline in taste or strength.
Factors That Affect the Curing Process
Before we get into exactly how to cure your cannabis buds, let’s discuss some of the factors that influence the process. This will help you gain a firm understanding of what to aim for and what to avoid.
💡 Avoid Light Exposure
During the curing process, you’ll need to keep your stash in a dark location. Light is one factor that can lead to the degradation of valuable molecules such as THC and terpenes. To avoid having light spoil the taste and potency of your flowers, keep your jars in a dark cupboard or box. Alternatively, storing your buds in miron glass jars, a type of glass that filters out all visible light apart from violet, will offer additional protection.
🌡️ Protect Your Stash From Heat
Heat will only be a substantial issue if you live in a climate where it becomes exceptionally hot. Heat is another factor that can lead to the degradation of cannabinoids, potentially reducing the potency of your buds. Be sure to keep your jars in a cool location to minimise damage and mould formation. An ideal room temperature for curing is around 21°C.
🌫️ Find the Humidity Sweet Spot
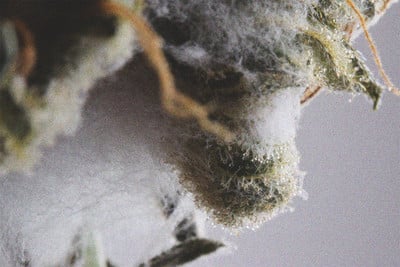
Curing is a straightforward process considering you start with properly dried buds. If your stash is too wet before curing, buds will clump together and there’s a good chance that mould will take hold. Increased moisture will also encourage anaerobic bacteria to start breaking down your stash. A telltale sign this is happening is the smell of ammonia emerging from your jars every time you open them.
On the flip side, curing bud that is too dry will create a crumbly and harsh stash that isn’t pleasant to smoke. Ideally, cannabis flowers should be dried in a room with a humidity of between 45–55%. This will result in a dry and slightly crumbly exterior and a more humid interior. Once it comes time for curing, humidity is increased slightly to an ideal reading of around 62%.

The Best Way to Cure Your Cannabis Buds
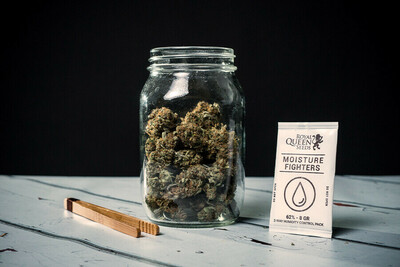
Now that we’ve discussed these vital factors, keep them in mind as you proceed to cure your stash. In reality, curing is simply a matter of opening and closing jars at the correct time. By placing your dried cannabis flowers into airtight glass mason jars, you’ll be creating an optimally controlled environment. These enclosed vessels allow humidity from within the flowers to rehydrate the exterior, without buds becoming overly wet. The end goal is a stash that smokes smooth and offers superior tastes.
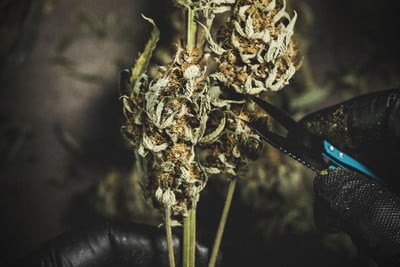
Step 1: Trimming Your Buds


To begin the process, you’ll need to prepare your flowers accordingly. If you dried your buds individually, you’re good to go. If you elected to dry them by the branch, then you’ll need to get trimming. Separate each bud and rid them of sugar leaves.
Step 2: Stashing Your Flowers


Next, you’ll need to place your stash into airtight containers. Mason jars provide a sturdy option and allow growers to easily monitor their buds throughout the process.
Place the buds loosely into the container and fill to 75% capacity. It’s important to leave room for air. Now is a good time to test if your stash is dry enough for curing. Give the jars a gentle shake. If your buds rattle around the glass freely, then continue with the next steps. If they begin to clump together, this is a sign the exterior is still too wet and further drying is required.
Step 3: Curing Your Weed With Optimal Humidity


Apply the lids to your jars and place them in a cool and dark location to protect against the threats mentioned above. Ideally, place them in a cupboard or other storage room that maintains a temperature of 21°C and a relative humidity of 60–65% within the jars. The only way to accurately measure this is to add a small hygrometer (a device that measures humidity) to each jar.
Step 4: Regulating Humidity Levels


During the first couple of days, you’ll need to check on your buds around twice per day. Inspect them through the glass and keep a careful eye on any mould formation. You’ll also need to open the lids for a couple of minutes each time you check to allow for fresh air exchange. Keep an eye on your hygrometers. If the reading displays 60–65% humidity, continue as normal. If things are getting too wet, leave the lids off the jars for around 3 hours to let excess moisture escape. If humidity is too low, leave the lids on for longer periods without breathing sessions. If you still don’t notice any increase in humidity, place a small humidity pack inside the affected jars.
Step 5: You’re Almost There


Continue to open the jars once per day over the next 2 weeks while taking appropriate measures to maintain optimal humidity. After 3 weeks, your buds will be well cured and ready to smoke up. However, the more patient smokers out there will receive the best rewards. Your flowers will continue to increase in quality for up to 6 months of curing.