Included FREE items


How and When to Transplant Cannabis Seedlings
- Growing cannabis step by step
- Cannabis growing basics
- Choosing your seeds
- How to germinate seeds
- The cannabis vegetative stage
- The cannabis flowering stage
- Harvesting cannabis
- Trimming, drying, and curing
- Choosing pots and soil
-
Growing indoors
- A Complete Overview Of Growing Cannabis Indoors
- Cannabis Cultivation Tips: How To Set Up Indoor Grow Lights
- How Many Cannabis Plants Can You Grow Per Square Metre?
- Indoor Cannabis Growing: Relative Humidity and Temperatures
- Hydroponics Cannabis Growing Guide (with diagrams)
- Cannabis Micro Growing: Growing Great Weed in Tiny Spaces
- Growing outdoors
- How to grow autoflowering cannabis
- Cannabis nutrients and pH
- Cannabis troubleshooting: Nutrients
-
Cannabis troubleshooting: Growing
- Cannabis Seed Germination — Troubleshooting Guide
- How to Deal With Pythium (Root Rot) in Cannabis Plants
- Slow Cannabis Plant Growth And What You Can Do About It
- How to Prevent and Fix Stretching in Cannabis Seedlings
- Watering Your Cannabis: How To Fix Over And Underwatering
- Understanding Male, Female, And Hermaphrodite Cannabis
- Identifying and Treating Common Cannabis Ailments
- How To Revive a Sick Cannabis Plant
- How to Avoid Mouldy Weed During Drying and Curing
- How to Prevent and Treat Dry and Crispy Cannabis Leaves
- What Cannabis Leaves Can Tell You
- Yellow Cannabis Leaves
-
Cannabis Strains Grow Report
- HulkBerry Automatic Grow Report
- Blue Cheese Auto Grow Report
- Purple Punch Automatic Grow Report
- Triple G Automatic Grow Report
- Do-Si-Dos Automatic Grow Report
- Green Gelato Automatic Grow Report
- Haze Berry Automatic Grow Report
- Purple Queen Automatic Grow Report
- Cookies Gelato Automatic Grow Report
- Sherbet Queen Automatic Grow Report
- Sweet Skunk Automatic Grow Report
- Medusa F1 Grow Report
- Cannabis plant training
-
Weed growing tips
- The Cannabis Plant Anatomy
- How to preserve seeds
- How Much Sunlight Do Outdoor Cannabis Plants Need To Grow?
- How to Control and Prevent Stretching in Cannabis Plants
- How And When To Transplant Your Cannabis Plants
- My Cannabis Plants Are Growing Too Tall: What Should I Do?
- Should You Worry About Purple Or Red Cannabis Stems?
- What To Do When Your Indoor Cannabis Won’t Flower
- How To Protect Your Cannabis Plants From Heat Stress
- How To Tell If Your Female Cannabis Plant Has Been Pollinated
- Growing Medical Marijuana
- Bud Washing: How to Clean Your Weed
Contents:
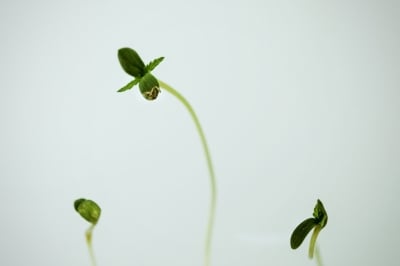
The Optimal Conditions for Seedlings
Cannabis seedlings need to be treated delicately. Mind your marijuana like babies. If seedlings need support, prop them up with a toothpick or a cocktail stick and some soft gardening wire.
An 18-6 light schedule is considered the sweet spot by most growers. White light is preferred. The source of light should be CFL, MH, or LED. If you have a sunny windowsill, it can work in a pinch.


Roots grow in the dark. That’s why we advocate 18-6 or 20-4 over a nonstop 24-hour light cycle. High humidity, ideally around 70% RH, and temperatures in the 20–24°C range make for a perfect seedling habitat. A propagator, thermo-hygrometer, and a spray bottle of water are the tools to help you dial it in.
Stretchy or floppy seedling growth can be due to genetics. Often, it’s an indication the grow lamp is positioned too far away from the canopy. A cool white 250W CFL can comfortably hang 15cm above a dozen or more seedlings without scorching leaves.
We recommend using LED lights once your seedlings have entered the veg stage proper, as these are cost-effective and produce little heat. For best results, grow your seedlings under an 18/6 light cycle using CFL bulbs with a blue light spectrum for the first 10–14 days. Once they’ve developed healthy true leaves, you can move them under stronger HID or LED lights to start vegging. To begin with, hang your LEDs somewhere between 30–45cm from the canopy, then adjust to around 45cm during late veg and flowering.
What's the Best Starter Substrate?
The medium must be wet, not waterlogged. An effective wet-dry cycle is the goal. Remember to resist the temptation to overwater. Better to mist plants with a sprayer if you are not sure. Touch the medium to feel how dry it is and keep RH high.
Before we go into the specifics, we need to be clear that starting in one medium and switching to another can be hazardous. Keep it simple and keep it consistent. You can’t start seedlings in soil and transplant later into a DWC bucket.
Starter Germination Kits
Germination kits are available that provide high-quality soil enriched with beneficial bacteria and offer straightforward functionality, ensuring an ideal environment for the early stages of cannabis seedling growth. These kits promote the development of airy soil, which is crucial for nurturing young roots. Additionally, they simplify the process of transplanting as the seedlings mature.
-
Royal Queen Seeds Starter Kit
The Royal Queen Seeds Starter Kit contains Easy Start pots and beneficial bacteria that enhance the germination rate of your seeds. It also includes a propagator designed to maintain high humidity—a critical factor for successful cannabis seed sprouting. The pots are compact yet easy to handle and remove, facilitating seamless transplantation.

-
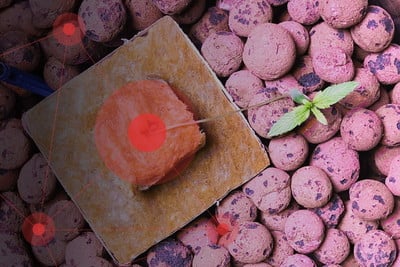
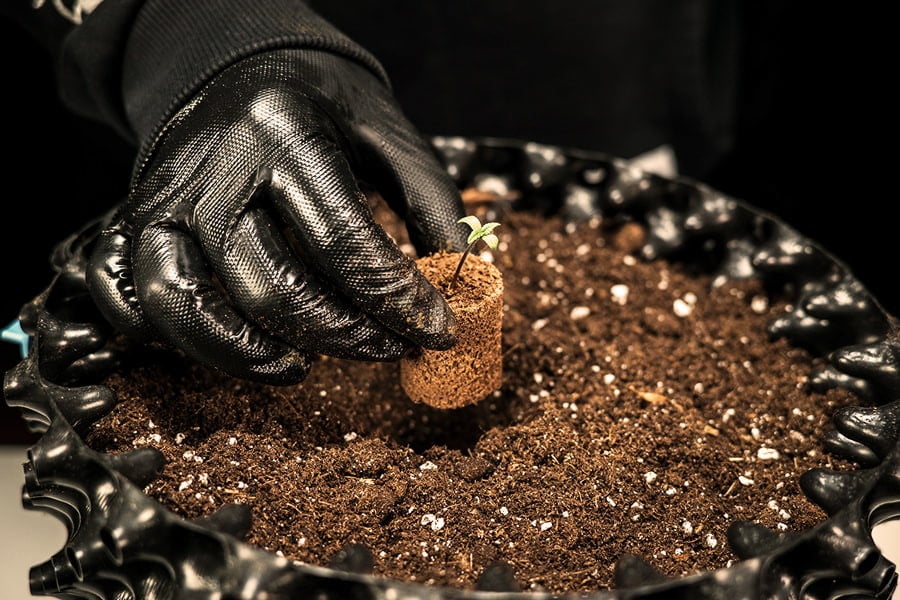
Soil Plugs
Coco coir soil plugs are excellent for germinating cannabis seeds due to their high transpiration rates, which prevent water-clogging. However, they lack nutrients, so once you've achieved successful germination and have healthy seedlings, it's important to transplant them promptly, as they will soon require additional nourishment.

-
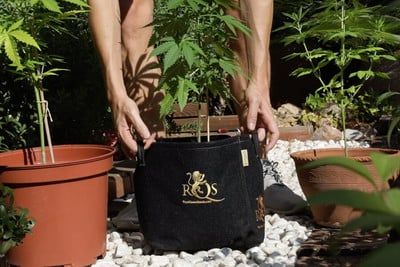
Geotextile Transplanting Pots
Our geotextile transplanting pots are expertly designed for optimal plant growth. With excellent aeration and drainage, they come in three sizes (5L, 8L, and 11L), perfect for seed starting and transplantation. Featuring a Velcro wall, they offer easy access for gentle soil and plant removal, eliminating the need for digging.

-
Cubes, Cups and Small Conatiners
Rockwool cubes and blocks are made for hydroponic growers. Start your seedling in a small cube and it couldn’t be easier to transplant later. Simply cut a cube-sized chunk out of a larger block and insert. The process can be repeated with minimal stress to plants.
Unfortunately, rockwool is a really bad idea for soil growers, even the smaller sized blocks. Invariably, the block retains more water than the surrounding soil. Green, sludge-like algae growth soon becomes a problem. Sure, sometimes you can get away with the tiny cubes, but why take the risk?
An oxygen-rich medium that drains well is the ideal mix for soil and/or coco growers. Between these two growing styles, there is the most overlap during the seedling stage. Peat or coco cubes are easy to use and relatively inexpensive. Similar to a rockwool block, you can visually monitor root development as the white spaghetti strands protrude from the cube. Growers, both organic and hydro, working with clones report the highest success rates using the cube-sized starter mediums.
Many soil and coco growers use cups or small plastic pots as starter containers, typically, anywhere in size from 0.5–5l. Lightly fertilised soil mixed with perlite or coco coir mixed with 30–50% perlite are the most common blended media for seedlings. So long as the base of the container has plenty of drainage holes and the interior can hold the volume of medium required, it can serve as a starter pot. Don’t be afraid to improvise. Poke a few holes in the base of a paper coffee cup with a pin and it becomes a pot.
You may also come across what is described as the Solo Cup method. It’s the same thing; simply a plastic cup that’s used to start seedlings in. The seedling still requires transplantation. Fortunately, the plastic cup is easy to cut off, making the transition to a larger pot quick and simple.
The benefits? It's cheap, readily available, and only needs small holes at the bottom to avoid waterlogging.


When to Transplant Marijuana Seedlings
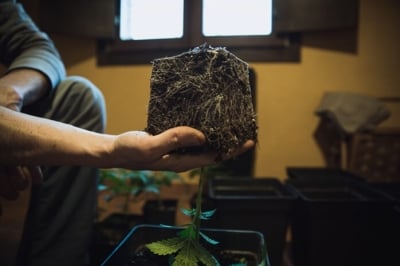
The right time to transplant your seedlings is just before they outgrow their current container. With cubes, you can see roots poking out telling you it’s time to pot up. When you start with a cup or small pot, you are relying on above-ground cues. Typically, when the set or sets of true leaves of the seedling have spread out to cover the circumference of the container, it’s time. Also, vertical growth will be an obvious indicator.
Don’t wait too long to transplant. Rootbound plants will take time to recover and may be permanently stunted. In general, it takes 7–10 days for a seedling to take root and outgrow small starter pots of 1l or less.
If using the above-mentioned products (Starter Kit, plugs, or a plastic/paper cup), then be aware of their properties too. Starter plugs are very small, meaning that you need to transplant your seedlings fairly quickly, otherwise you will find that they start stretching. Soil Plugs offer a bit more leeway due to their larger size, allowing for more root development, although they lack nutrients. With a Solo Cup, you have a bit more flexibility and could wait until the seedling has around three true sets of leaves before transplanting.
How to Transplant Seedlings
Transplanting seedlings is pretty straightforward, but how you go about it will depend on how you started them in the first place. Below, find instructions for transplanting seedlings from all of the above-mentioned starting methods.
-
Starter Kit
After germination, and once your seedlings have developed the cotyledons (the first pair of small leaves), gently move them to a larger pot filled with your medium of choice. Ensure the first true leaves are above the soil to avoid damping off.
Wait until the soil in the Easy Start pots of the Starter Kit is fairly dry, and then turn the pots upside down and your seedlings should easily slide out. Don’t tug at the main stem! Dig a small hole in the soil of your new pot and plant the seedling. Cover loosely with soil.

-
Soil Plugs
Soil plugs provide a compact, nutrient-rich environment for seedlings. To transplant, make a hole in your new medium that’s just the right size for the plug. Carefully place it in, ensuring the seedling is upright and secure.
This process is very easy, and is highly suited to beginners, as there’s little that can go wrong.
-
Solo Cup
Solo Cups are a popular, budget-friendly option. When roots emerge from the drainage holes, it’s time to transplant to a larger container or final growing medium.
Allow the soil to dry out a bit, then turn the cup upside down with the stem of the seedling coming through your fingers. Squeeze the cup gently, and the root system along with the soil should slide out easily enough. Bury the roots in a larger pot and do not compact the soil too much.
-
Cubes
Cubes are the easiest to work with. Either cut a hole to size in a bigger block, or burrow a hole into the medium with your fingers and insert for a snug fit. Potting up takes a little more finesse. First, don’t fill your large container all the way to the top. Leave room so you can water properly later. If you pack the pot to the top, water will mostly run off and not reach the roots.
Next, make an impression in your large container with another small pot, or the one with the plant in it if you don’t have any others. Make this impression in the medium after you have watered it. This creates a perfect imprint for the transplant.
It’s best to wait until the medium in the small pot is dry before going for a transplant. Wet soil can fall apart in chunks as you fumble with the sopping mud. Now, turn the dry plant upside-down and firmly pat the bottom. Grasp the plant stem from the base and ease the compacted medium out of the container in one piece. Some topsoil will spill, but don’t worry.
Finally, gently slide the plant, roots first, into the large container. Replace the lost topsoil or coco with a handful or two over the top and add a little more water. That’s the secret to stress-free transplanting.
-
Coco
Coco coir offers excellent aeration and moisture retention. Transfer seedlings by creating a hole in the pre-moistened coco, being careful not to damage the roots. Coco requires frequent, light watering with added nutrients due to its low nutrient content.
You might also want to add coco to the soil, which is easy enough. Just make a hole the size of your coco starter block and place it in, as outlined in previous methods.
-
Rockwool (Hydroponics)
For hydroponic setups, Rockwool cubes are a standard. How exactly you transplant will depend significantly on your hydro setup and which system you're using, as each is somewhat different. For those planning to house their specimens in net pots, transplant by positioning the Rockwool cube into a pot with another inert growing medium (to provide necessary structure), such as a larger Rockwool block.
Ultimately, the main benefit of using Rockwool as a starter is that the block can be easily fitted into any larger system, even a soil-filled pot!
-
Geotextile Transplanting Pot
Using these pots as starters allows you to provide seedlings with nutrient-rich soil from the beginning. Once the seed has sprouted and developed into a seedling, even with a few true leaves, simply utilize the Velcro feature to open the pot and transplant it into its final medium—a larger pot or a garden bed. Depending on the size of the transplanting pot, if you notice stunted growth or inadequate water absorption in the young plants, it may indicate the need for transplantation.


What to Do After the Transplant?
After transplanting, the next steps are crucial for ensuring your seedlings adapt well and thrive in their new environment, otherwise you might find they wilt and die. Here are some detailed tips to help you get your seedlings used to their new home.
-
Watering Schedule
Initially, give your seedlings a thorough watering to settle the soil or medium around their roots. This initial watering is critical for establishing a good connection between the roots and their new home. However, be cautious not to waterlog the plants as the young roots shouldn’t be deprived of oxygen, else they will die. Going forward, maintain a consistent watering schedule that keeps the soil evenly moist but not saturated, ensuring you adjust according to the medium's drying rate and the plant's growth phase. If in doubt, don’t water unless the top inch or so of soil is completely dry.
-
Light Adjustment
Light is a vital factor in your seedlings' recovery and growth post-transplant. Adjust the light source to provide adequate but not excessive light, helping to prevent stress and light burn. As we suggested earlier, LED lights are a very good choice. In terms of exposure, we recommend a cycle of 18 hours of light and 6 hours of darkness.
-
Care
Continuing to provide optimal conditions for your seedlings is really important, as they will inevitably experience some transplant stress. Proper seedling care includes not just the right light and watering schedule, but also maintaining the appropriate temperature, humidity, and airflow around the plants. Watch your seedlings closely for any signs of distress, such as drooping leaves or discolouration, which could indicate stress, nutrient deficiencies, or the presence of pests or diseases. Address these issues quickly if they do show up.
-
Support
As your seedlings grow, some may need extra support to stay upright and develop properly. Tall or leggy seedlings, in particular, can benefit from stakes, trellises, or other support structures. Providing support early can prevent damage or stress to the plants, aiding in their overall health and productivity. Good lighting, that is strong enough and positioned correctly, will help to stop seedlings from stretching and minimise the need for structural support.
-
Gradual Acclimatisation
If your ultimate goal is to move seedlings outdoors, you’ll need to acclimate them gradually to their new environment—this process is called hardening off. Begin by exposing them to sunlight and outdoor temperatures for short periods, gradually increasing the duration over several days. This method reduces the shock from sudden changes, helping your plants adjust more smoothly to outdoor growing conditions. You should note that it’s not just the cold that can damage them, but the strength of direct sunlight too.
Potting Up vs Sowing in a Bigger Pot
If your final container size is up to 11l, you have the option to sow seeds directly. This is only a viable option when growing from seed. Clones will not take root in such a large container. Initially, seedlings in large pots will grow more slowly than those in smaller containers. After a few weeks of vegetative growth, the difference is negligible.
If you don’t transplant, then you eliminate the risk of transplant shock. But you also limit the potential of your cannabis plants. That being said, a first and final transplant is sometimes the best option for autoflowering strains with a short life cycle.
Unless smaller plants are advantageous due to limited grow space, bigger is always better. Transplanting is not something beginner growers should avoid. The only way to learn is by doing. If you ever want to grow marijuana monsters, you need to master transplanting seedlings.