Included FREE items


A Complete Overview Of Growing Cannabis Indoors
- Growing cannabis step by step
- Cannabis growing basics
- Choosing your seeds
- How to germinate seeds
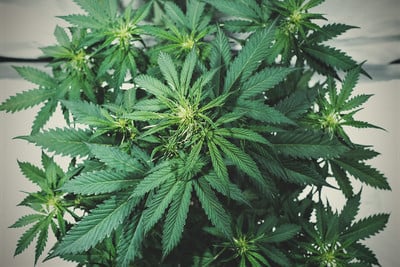
- The cannabis vegetative stage
- The cannabis flowering stage
- Harvesting cannabis
- Trimming, drying, and curing
- Choosing pots and soil
-
Growing indoors
- A Complete Overview Of Growing Cannabis Indoors
- Cannabis Cultivation Tips: How To Set Up Indoor Grow Lights
- How Many Cannabis Plants Can You Grow Per Square Metre?
- Indoor Cannabis Growing: Relative Humidity and Temperatures
- Hydroponics Cannabis Growing Guide (with diagrams)
- Cannabis Micro Growing: Growing Great Weed in Tiny Spaces
- Growing outdoors
- How to grow autoflowering cannabis
- Cannabis nutrients and pH
- Cannabis troubleshooting: Nutrients
-
Cannabis troubleshooting: Growing
- Cannabis Seed Germination — Troubleshooting Guide
- How to Deal With Pythium (Root Rot) in Cannabis Plants
- Slow Cannabis Plant Growth And What You Can Do About It
- How to Prevent and Fix Stretching in Cannabis Seedlings
- Watering Your Cannabis: How To Fix Over And Underwatering
- Understanding Male, Female, And Hermaphrodite Cannabis
- Identifying and Treating Common Cannabis Ailments
- How To Revive a Sick Cannabis Plant
- How to Avoid Mouldy Weed During Drying and Curing
- How to Prevent and Treat Dry and Crispy Cannabis Leaves
- What Cannabis Leaves Can Tell You
- Yellow Cannabis Leaves
-
Cannabis Strains Grow Report
- HulkBerry Automatic Grow Report
- Blue Cheese Auto Grow Report
- Purple Punch Automatic Grow Report
- Triple G Automatic Grow Report
- Do-Si-Dos Automatic Grow Report
- Green Gelato Automatic Grow Report
- Haze Berry Automatic Grow Report
- Purple Queen Automatic Grow Report
- Cookies Gelato Automatic Grow Report
- Sherbet Queen Automatic Grow Report
- Sweet Skunk Automatic Grow Report
- Medusa F1 Grow Report
- Cannabis plant training
-
Weed growing tips
- The Cannabis Plant Anatomy
- How to preserve seeds
- How Much Sunlight Do Outdoor Cannabis Plants Need To Grow?
- How to Control and Prevent Stretching in Cannabis Plants
- How And When To Transplant Your Cannabis Plants
- My Cannabis Plants Are Growing Too Tall: What Should I Do?
- Should You Worry About Purple Or Red Cannabis Stems?
- What To Do When Your Indoor Cannabis Won’t Flower
- How To Protect Your Cannabis Plants From Heat Stress
- How To Tell If Your Female Cannabis Plant Has Been Pollinated
- Growing Medical Marijuana
- Bud Washing: How to Clean Your Weed
An overview of how to grow cannabis indoors.
Contents:
“Dude, I should grow my own weed!”
If you love cannabis, chances are you’ve caught yourself saying or thinking that on at least one or two occasions. Well, if you’re finally ready to get your hands dirty and dive into the rich world of cannabis cultivation, you’re in luck.
Below, you’ll find a complete walkthrough of all the basic concepts involved with growing great weed indoors.
Why grow cannabis indoors?
Growing cannabis indoors has a lot of advantages:
- Year-round harvests
- Consistency in crop
- Control over the growing environment
- Control over flowering (for photoperiod strains)
- Privacy
- Fewer pests
What tools and equipment do you need to grow cannabis indoors?
To grow great weed indoors, you’re going to need the following:
| Designated grow space | This can be a spare room, a DIY tent, a broom cupboard, a refurbished piece of furniture, or even an old fridge! | |
| Thermometer/Hygrometer | You’ll use these to help track the temperature and humidity of your grow space. | |
| Scissors and shears | Trimming, training, and manipulating cannabis strains can really help them flourish and produce bigger, denser, and more potent flowers. | |
| pH and PPM meters | These tools will help you track the pH and electrical conductivity of your medium to ensure your plants can access all the nutrients you’re feeding them. | |
| Lux meter | Cannabis plants love light, and lux meters help you measure and optimise the light in your grow room. | |
| Timers | To automate the light cycle. | |
| String | To tie down your plants for training. You’ll want to use appropriate gardening wire or something similar to avoid damaging your plants. | |
| Buckets/measuring cup | To measure out your nutrients. | |
| Jeweller's loupe | To inspect the trichomes of your plants as they flower, and to inspect the foliage for any pests or other issues. | |
| Garden stakes | To support heavy branches during flowering. | |
| Nutrients | These can come in several forms, but your plants will require sufficient nutrients to churn out a productive harvest. | |
| Containers | 11-litre white plastic pots tend to be the norm among most indoor growers. However, fabric pots and other smart pots can also be used. You can fit around nine 11-litre pots per m². | |
| Seedling Starter Kit | Our Starter Kits come with feminized or autoflowering seeds and a propagator, making it easy to create the perfect environment for your seedlings. |
| Designated grow sopace |
|
This can be a spare room, a DIY tent, a broom cupboard, a refurbished piece of furniture, or even an old fridge! |
 |
| Thermometer/Hygrometer |
|
You’ll use these to help track the temperature and humidity of your grow space. |
 |
| Scissors and shears |
|
Trimming,training, and manipulating cannabis strains can really help them flourish and produce bigger, denser, and more potent flowers. |
 |
| pH and PPM meters |
|
These tools will help you track the pH and electrical conductivity of your medium to ensure your plants can access all the nutrients you’re feeding them. |
 |
| Lux meter |
|
Cannabis plants love light, and lux meters help you measure and optimise the light in your grow room. |
 |
| Timers |
|
To automate the light cycle. |
 |
| String |
|
To tie down your plants for training. You’ll want to use appropriate gardening wire or something similar to avoid damaging your plants. |
 |
| Buckets/measuring cup |
|
To measure out your nutrients. |
 |
| Jeweller's loupe |
|
To inspect the trichomes of your plants as they flower, and to inspect the foliage for any pests or other issues. |
 |
| Garden stakes |
|
To support heavy branches during flowering. |
 |
| Nutrients |
|
These can come in several forms, but your plants will require sufficient nutrients to churn out a productive harvest. |
 |
| Containers |
|
11-litre white plastic pots tend to be the norm among most indoor growers. However, fabric pots and other smart pots can also be used. You can fit around nine 11-litre pots per m². |
 |
| Seedling Starter Kit |
|
Our Starter Kits come with feminized or autoflowering seeds and a propagator, making it easy to create the perfect environment for your seedlings. |
 |
Choosing the best place to grow cannabis indoors
Growers have plenty of choices when it comes to setting up their growing area. Check out the best places to start your grow—and the benefits of each—below.
Basement
Situated underground, basements provide a concealed safe haven for cultivating cannabis. They are usually void of windows, meaning they are free of light leaks—and thus ideal for photoperiod growers. Basements are also usually relatively large and provide more than enough room to obtain a heavy crop. You’ll also find your basement maintains a fairly even temperature all year round—they are easy to regulate using the same automated settings no matter the season.
Most basements have ventilation shafts to carry stagnant air outside. Be mindful of where this shaft ends—you don’t want to send a plume of terpenes towards your neighbour's windows. A good-quality carbon scrubber will remove the suspicious scent if you’re faced with this challenge.
Garage
Unless you use it to store your car, chances are your garage just holds random items and gardening equipment. Garages are usually cool in the summer and relatively warm in the winter, making them super easy to regulate. Grow tents also look a lot more innocent in a garage, opposed to standing tall and suspect in your bedroom or living room.
Garages usually aren’t as well insulated as the rest of the house. Be sure to cover up any gaps and drafts that might spread the smell of your crop down the street. If you’re not using a grow tent, black out any windows—the sight of bright pink and blue LEDs will surely arouse suspicion if not covered up.

Attic
An attic serves as one of the safest places to grow cannabis. Guests have no reason to enter, and most are only accessible using a step ladder. Most attics are also entirely blacked out and won’t leak light (which has the potential to revert your plants back to the vegetative phase).
Chances are your attic won’t have any power outlets, and running an extension cord up there might look out of place, so consider installing some outlets for increased stealth and ease. Unless you’re using LED lights, it’s also a good idea to run some fans to keep the room cool.
Grow box
You can grow cannabis literally anywhere in your house by building a grow box. With a few basic materials such as some PVC pipe, duct tape, a hand saw, a good light, and a fan, you’ll have everything you need to create your own custom grow box. You can modify the size of a grow box to fit flush with any corner within your house.

Closet or tiny space
Don't worry if you don’t have an attic, garage, or basement available. You can still achieve great yields in surprisingly small spaces. Use the principle of micro-growing to grow compact plants suitable for small converted cupboards, boxes, and buckets.
Build a grow room
Have space, time, and resources to build your very own grow room? If so, we highly recommend it! As opposed to growing in a tent or small box, you can construct a sturdy, closed-off room dedicated to cannabis, made out of wood, PVC, and the like. From here, the structure needs to be outfitted with lights, ventilation, etc. before it's ready to grow you some superior cannabis.
How to prepare your grow space
When it comes to setting up your indoor grow room, there are multiple options available to you. The easiest, of course, is to buy a ready-made grow tent online or from a grow shop. Tents come in a variety of sizes and prices. The main factors influencing the price of a grow tent are size and build quality. It goes without saying that your best bet is to invest in a tent made from quality, durable materials.
If you don’t want to buy a grow tent, you can build one either from scratch, or, if you have the space, you can turn a broom cupboard or small spare room into a grow space (just keep in mind that larger spaces will be more expensive to light, heat, air-condition, etc). Finally, if you want to get creative, we’ve also seen people turn old fridges or pieces of furniture into fantastic grow rooms.

Wherever you plan to grow, make sure to keep the following variables in mind when preparing your grow space:
• Smell: Newsflash—flowering cannabis plants really smell! If you’re worried about people knowing about your plants, make sure to invest in a carbon-filtered airflow system.

• Sound: Ballasts, fans, and extractors all make noise while they're running. If you're worried about keeping your grow-op secret, invest in quality fans and extractors, and seal-off your grow room.

• Ventilation: Stagnant air is a real problem for indoor cannabis growers as it can drive up the temperature and humidity levels in the grow room, which can in turn attract pests, moulds, and all sorts of other problems.

• CO₂: Supplementing CO₂ levels in your grow room during bloom can have a beneficial impact on the size and quality of your yield. If you have the budget, consider investing in a CO₂ generator to help your plants produce the best possible product.

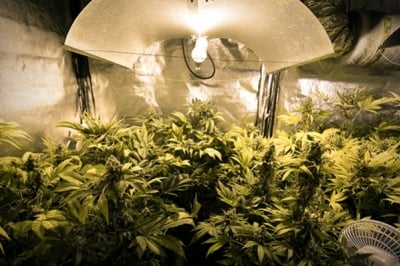
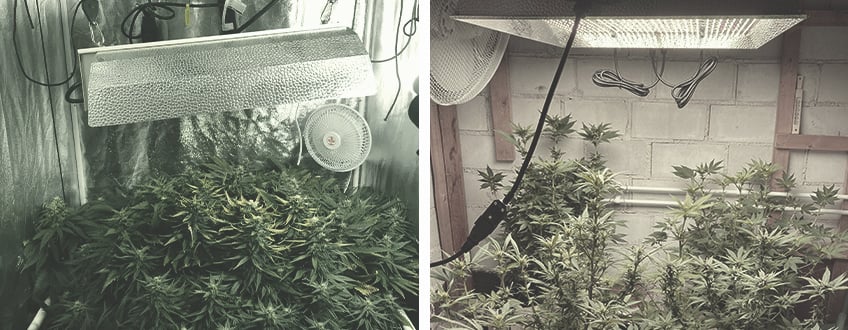
• Lighting: There are countless different grow lights on the market, and knowing which brand/model is worth your money can be tricky as a beginner. HPS lights are arguably the most common on the market, although LED lights are growing increasingly popular. You’ll need to make sure there’s sufficient space between the canopy and your lights to avoid burning your plants. In super small spaces, consider lighting your grow from the side.

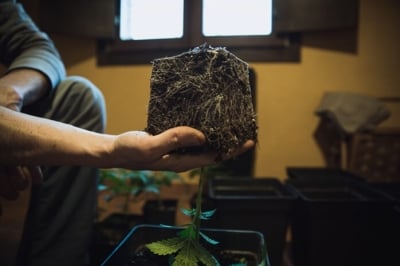
Choosing a growing medium
There are generally two different methods/mediums you can use to grow cannabis indoors:
| Soil |
Growing in soil is arguably the easiest way to cultivate weed, especially for beginners. Either invest in a quality ready-made soil or try your hand at creating your very own cannabis super soil. |
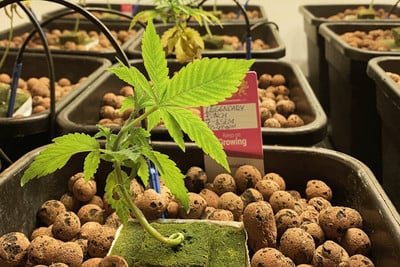
| Hydroponics | Hydroponics uses water or soilless substrates such as peat, coco coir or some other mix of inert substances as the main growing medium. Plants are fed water-soluble nutrients directly via the roots. This gives the grower a lot more control over the nutrient intake of their plants as there is no soil to buffer the feed. For experienced growers, this added level of control can result in bigger, better harvests as their plants are able to take up more nutrients, faster. |
| Soil |
|
Growing in soil is arguably the easiest way to cultivate weed, especially for beginners. Either invest in a quality ready-made soil or try your hand at creating your very own cannabis super soil. |
| Hydroponics |
|
Hydroponics uses water or soilless substrates such as peat, coco coir or some other mix of inert substances as the main growing medium. Plants are fed water-soluble nutrients directly via the roots. This gives the grower a lot more control over the nutrient intake of their plants as there is no soil to buffer the feed. For experienced growers, this added level of control can result in bigger, better harvests as their plants are able to take up more nutrients, faster. |
Understanding the basics of cultivating cannabis indoors
Now that we’ve covered the basics of setting up a grow tent and the equipment you’ll need to invest in, it’s time to look at some of the basics of actually growing cannabis.
Below is a general overview of what to expect when growing weed indoors. This includes the process of selecting genetics, regulating temperature and humidity, germinating seeds, vegging, flowering, harvest, and more.
1. Choosing the right strain
There are countless cannabis strains on the market, and breeders put a lot of thought, time, and resources into constantly refining and creating new varieties of this age-old plant. So, as a beginner, how do you know whether you should be growing Blueberry or Super Silver Haze?
In general, we recommend indica-dominant strains for beginner growers. They flower faster, are more compact, and still produce spectacular results. While we also love sativas, their height and flowering time can make them a bit more challenging to handle, especially if you haven’t got many harvests under your belt, or many resources to boot.
If you can’t settle on a single strain, it’s perfectly fine to grow multiple cannabis varieties in the same tent or room. Just keep in mind that you’ll be dealing with plants of different heights and harvest times, which can be challenging if you’re not very experienced.
2. Germinating your cannabis seeds
There are a number of ways to germinate cannabis seeds. Most growers, however, wrap their seeds in some moist paper towel and keep them in a dark cupboard for 2–3 days until the seeds split.
For the best results when germinating seeds, use one of our Starter Kits. Complete with a propagator, Easy Start seedling pods, and three seeds (feminized or auto), these kits make germinating and growing healthy seedlings super easy. Seedlings like high humidity levels (65–70%) and temperatures of 20–25°C.
3. Maintaining optimal temperature and humidity
Like any other plant, cannabis thrives in specific environmental conditions. Temperature and humidity are arguably the biggest external factors influencing the health and growth of your plants.
During veg, daytime (or lights-on) temperatures should be kept between 22–28°C, while relative humidity should sit between 40–70%. Sativa strains can tolerate slightly warmer, more humid conditions than indicas. Lights-off temperatures during veg should sit between 18–23°C.
During flowering, you’ll want your room temperature to sit between 20–26°C. Your humidity shouldn’t exceed 50% to avoid bud rot and other fungal issues during this critical time. In the last 2 weeks of flowering (as you flush your plants), consider dropping your temperatures even further to 18–24°C, with humidity levels of 30–40%.
4. The vegetative phase
Cannabis plants enter the vegetative phase roughly 2 weeks post-germination. How long you let your (photoperiod) plants veg for is up to you; most growers, however, flip their plants to flowering after 4 weeks to prevent them from becoming too big.
As your plants veg, they’ll want plenty of nitrogen and potassium to develop healthy foliage and strong roots. A common NPK schedule for vegging plants is:
| Week 1 of vegetation |
4:2:3 |
| Weeks 2 and 3 of vegetation | 10:5:7 |
| Week 4 of vegetation | 7:7:7 |
| Week 1 of vegetation |
|
4:2:3 |
| Weeks 2 and 3 of vegetation |
|
10:5:7 |
| Week 4 of vegetation |
|
7:7:7 |
The vegetative phase is also when you’ll want to use any training methods like LST, ScrOG, or defoliation to help control the shape of your plants and improve their access to light. Once you’re happy with how your plants look, you’ll be ready to change their light cycle and transition them over to the flowering phase.
5. The flowering phase
The flowering phase is an exciting time for growers. For the first couple weeks of this phase, your plants will go through a period of accelerated growth or “stretch”. By the second week of flowering, your plants should display their sex (keep an eye out for male pollen sacs to avoid pollination) and begin developing their flowers. How long a plant takes to reach maturity varies among strains; some indicas are ready to harvest in 7–8 weeks, while some sativas can take over 12 weeks to reach maturity.
During flowering, you’ll want to feed your plants more phosphorus to support the growth and density of their flowers. Again, each grower has their own way of feeding their plants, but a common NPK schedule might look like:
| Weeks 1 and 2 during early flowering |
5:10:7 |
| Weeks 3 and 4 during mid-flowering | 6:15:10 |
| Weeks 5 and 6 during late flowering | 4:10:7 |
| Weeks 1 and 2 during early flowering |
|
5:10:7 |
| Weeks 3 and 4 during mid-flowering |
|
6:15:10 |
| Weeks 5 and 6 during late flowering |
|
4:10:7 |
During this stage, you can’t transplant or do much training to your plants. Some light defoliation is okay, but any major stress you inflict at this point will just interfere with their ability to produce flowers.
6. Flushing and harvesting
Flushing is a super important step in preparing for harvest. It involves cutting off all nutrients and administering only pH-controlled water for the last 1–2 weeks before harvest. This forces the plant to use up any nutrients, resulting in a cleaner, better-tasting smoke.
As you flush your plants each day, keep a close eye on their trichomes using your jeweller’s loupe. You’ll know your plants are ready to harvest when around 70% of the trichomes are cloudy, with the rest being a light amber brown.
For a constant supply of great bud, you can use the perpetual harvest method; this involves keeping two grow rooms, one for vegging and one for blooming, and moving new plants into bloom right after harvesting a set of flowering plants. While it can seem daunting, it’s the perfect way to never go without bud.
Remember: always keep things clean!
Congratulations! You’ve just harvested your first batch of home-grown indoor Kush. Now, just remember to clean your grow room, and you’ll be ready to sow your next batch of seeds. In the grow-op, cleanliness is next to godliness, and ensures your product always turns out the best it can be!