Included FREE items


How to Avoid Mouldy Weed During Drying and Curing
- Growing cannabis step by step
- Cannabis growing basics
- Choosing your seeds
- How to germinate seeds
- The cannabis vegetative stage
- The cannabis flowering stage
- Harvesting cannabis
- Trimming, drying, and curing
- Choosing pots and soil
-
Growing indoors
- A Complete Overview Of Growing Cannabis Indoors
- Cannabis Cultivation Tips: How To Set Up Indoor Grow Lights
- How Many Cannabis Plants Can You Grow Per Square Metre?
- Indoor Cannabis Growing: Relative Humidity and Temperatures
- Hydroponics Cannabis Growing Guide (with diagrams)
- Cannabis Micro Growing: Growing Great Weed in Tiny Spaces
- Growing outdoors
- How to grow autoflowering cannabis
- Cannabis nutrients and pH
- Cannabis troubleshooting: Nutrients
-
Cannabis troubleshooting: Growing
- Cannabis Seed Germination — Troubleshooting Guide
- How to Deal With Pythium (Root Rot) in Cannabis Plants
- Slow Cannabis Plant Growth And What You Can Do About It
- How to Prevent and Fix Stretching in Cannabis Seedlings
- Watering Your Cannabis: How To Fix Over And Underwatering
- Understanding Male, Female, And Hermaphrodite Cannabis
- Identifying and Treating Common Cannabis Ailments
- How To Revive a Sick Cannabis Plant
- How to Avoid Mouldy Weed During Drying and Curing
- How to Prevent and Treat Dry and Crispy Cannabis Leaves
- What Cannabis Leaves Can Tell You
- Yellow Cannabis Leaves
-
Cannabis Strains Grow Report
- HulkBerry Automatic Grow Report
- Blue Cheese Auto Grow Report
- Purple Punch Automatic Grow Report
- Triple G Automatic Grow Report
- Do-Si-Dos Automatic Grow Report
- Green Gelato Automatic Grow Report
- Haze Berry Automatic Grow Report
- Purple Queen Automatic Grow Report
- Cookies Gelato Automatic Grow Report
- Sherbet Queen Automatic Grow Report
- Sweet Skunk Automatic Grow Report
- Medusa F1 Grow Report
- Cannabis plant training
-
Weed growing tips
- The Cannabis Plant Anatomy
- How to preserve seeds
- How Much Sunlight Do Outdoor Cannabis Plants Need To Grow?
- How to Control and Prevent Stretching in Cannabis Plants
- How And When To Transplant Your Cannabis Plants
- My Cannabis Plants Are Growing Too Tall: What Should I Do?
- Should You Worry About Purple Or Red Cannabis Stems?
- What To Do When Your Indoor Cannabis Won’t Flower
- How To Protect Your Cannabis Plants From Heat Stress
- How To Tell If Your Female Cannabis Plant Has Been Pollinated
- Growing Medical Marijuana
- Bud Washing: How to Clean Your Weed
Don’t let your guard down after harvest—learn how to protect your buds from mould during the final stages of the growing process.
Contents:
What Makes Cannabis Buds Mouldy?
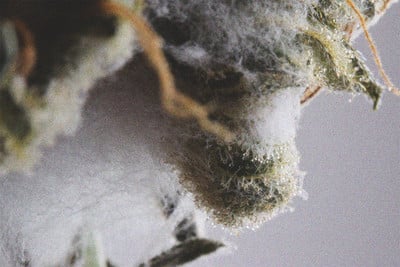
The mould that can develop on cannabis flowers, colloquially called “bud rot” by growers, is caused by Botrytis cinerea, a necrotrophic fungus that also grows on grapes, strawberries, tomatoes, and other fruits and vegetables.
Botrytis thrives in warm, humid climates and attacks the living cells of plants or fruit, while feeding on the dead matter. It develops on the stems of live cannabis plants or harvested flowers and slowly grows outwards, which makes it particularly hard to spot. Usually, by the time you spot botrytis on the surface of a bud, it will have almost completely destroyed its insides, leaving it wet, slimy, and smelly.
How to Prevent Mould after Harvest
In the grow room, the principles of preventing mould are maintaining optimal temperature and relative humidity, as well as proper air circulation. Post-harvest, you’ll want to follow the exact same principles to avoid losing your hard-earned buds to mould.
Drying
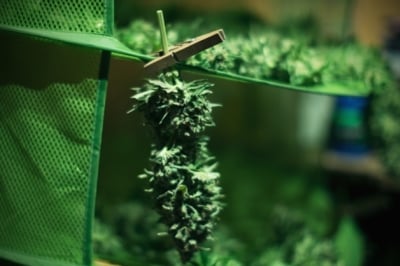
Cannabis flowers have a high water content when they are harvested. Therefore, before you light up your buds, you need to be patient and let them dry till they contain only about 10–15% of water.
Drying your buds is as simple as hanging them upside down from a piece of string or clothesline. Where you hang them is completely up to you, just make sure they are in a dry, dark place where the air circulates freely. Growers typically dry their buds in a designated room or a cupboard/closet. If you’re short on space, you can even hang your buds inside a cardboard box; just make sure to poke some holes in the box for the air to circulate.
Creating the Perfect Drying Environment
Ideally, you’ll want to dry your buds at 18–20°C and 50–60% relative humidity. Some growers like to keep the temperature at the higher end of the spectrum during the first 3 days to dry their buds a little faster, before drawing the temperature back down to slow the process. You’ll know your buds are ready to be cured once their stems snap easily. This can take up to 2 weeks, but it will vary depending on the temperatures and humidity levels you’re drying your flowers at.
If it’s hot, we recommend drying your buds in a lightly air-conditioned room. You can also use air-conditioning to drive down the humidity if you live in a particularly humid area. Finally, remember to use fans to circulate the air around your buds to dry them evenly and further prevent mould from forming.


Curing
Once your buds are nice and dry, you’ll want to cure them in airtight jars for at least 2–3 weeks (or more, if you have the patience).
As buds cure, they continue to lose moisture, but at a much slower rate. This slow release of moisture helps bring out the aromas and flavours in your flowers and also purges any impurities. Unfortunately, the build-up of moisture inside your curing jars can also create the perfect conditions for botrytis spores to grow.
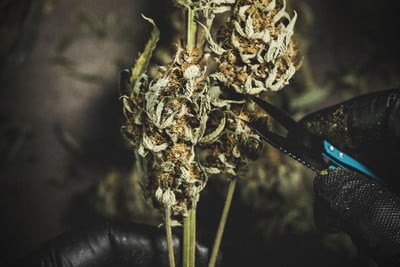
Trim Like a Pro and Keep Things Clean
Before you cure your buds, you must ensure they’ve been trimmed to perfection. Old foliage like leaves and stems can trap humidity and create the ideal environment for mould. Whether you prefer trimming wet or dry, make sure your harvested flowers are free of unnecessary plant matter before you pack them into your curing jars.
Another key step to preventing mould when curing weed is cleanliness. Make sure your jars are sterile and dry before you start filling them with flowers. Also, only fill your jars to 3/4 of their capacity. Keep your jars in a cool, dry, and dark place (light degrades THC and can drive down the potency of your buds).
The Art of Burping
To further prevent mould when curing weed, we recommend you open (or “burp”) your jars 2–4 times a day to remove and replace the old, humid air. After about 1 week, you can start burping your jars less frequently (1–2 times per day), as the flowers will be dryer and release less moisture.
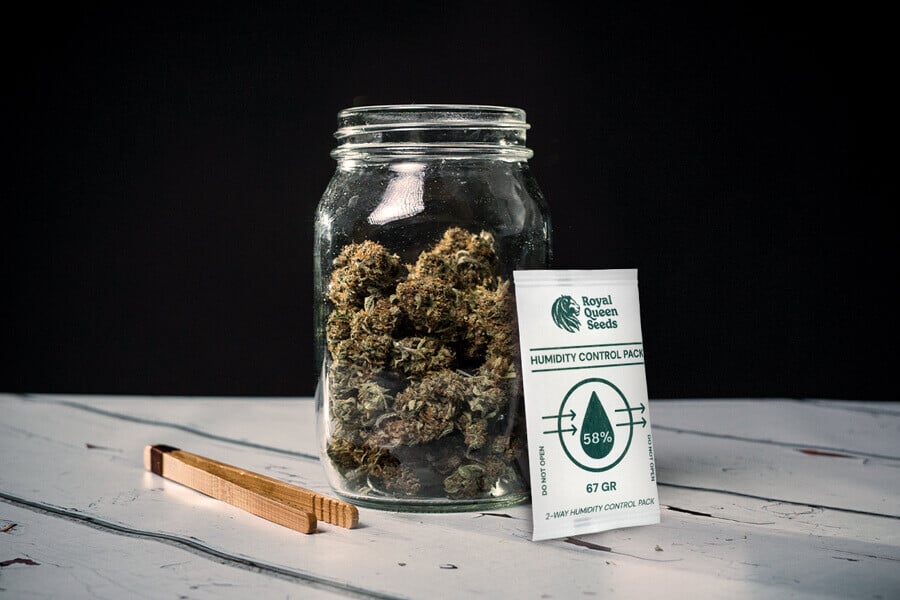
If you’re worried you’ll forget to burp your jars (or you’re lucky enough to have a huge harvest on your hands), you can use humidity packs to control moisture levels inside your jars. For curing cannabis, we recommend using packs that help maintain 62% humidity.
Keep a Watchful Eye
Finally, the best protection against mould is a keen eye. Make sure to regularly inspect your buds during the curing process. If you suspect some of your buds to be developing mould, separate them from the rest as quickly as possible to avoid the fungus spreading even further.
Storage
Once you’ve cured your weed for at least 2–3 weeks, it’s officially ready to be smoked. You can continue storing your flowers in your curing jars, using humidity packs to avoid them drying out too much over time and to maintain humidity inside the jars at optimal level. Remember that your buds will continue curing and their flavours should intensify as they mature, so don’t smoke your way through the stash too quickly!
Keeping Mould at Bay—Bottom Line
It’s vital that you don’t rush your way through the final stages of the growing process. While we know you’ll be anxious to sample your home-grown buds, taking the time to properly trim, dry, and cure your flowers will take them to the next level in terms of flavour, aroma, and potency, all the while keeping them safe from mould.
And if you do find buds that are affected by the dreaded fungus, make sure you remove them and closely inspect the rest, as smoking mouldy weed is dangerous for your body!
Humidity Packs Protect Against Mould
Humidity packs are small and simple tools that pull in moisture from the surrounding environment. When the moisture level starts to climb, they’ll absorb water particles that would otherwise serve as a breeding ground for mould.
Moisture Fighters Offer Two-Way Control
At Royal Queen Seeds, we engineered our own humidity packs specifically for curing cannabis buds. Our Moisture Fighters possess a two-way control mechanism that allows them to both trap and release moisture. This enables them to take in excess moisture while also preventing your flowers from becoming too dry and losing their flavour.

A Plant-Based Product With No Preservatives
Our Moisture Fighters are crafted with the health of the environment and your buds in mind. Each packet derives entirely from plant-based materials and contains absolutely zero preservatives. You don’t have to worry about any unwanted chemicals leaching out and contaminating your pristine organic flowers.
Humidity Indicators Keep You Informed
Moisture Fighters remove any guesswork from the curing process. Each pack features a card that houses a humidity indicator. This reusable piece of kit will let you know when you need to swap out your Moisture Fighters. Knowing exactly when to do this means you’ll keep the curing environment perfect during the entire process.
How to Use Moisture Fighters
Moisture Fighters are extremely easy to use. Keep your flowers juicy and terpene-rich using the steps below.
- Remove Moisture Fighters from their packaging, making sure not to open the Fighter itself.
- Place a Moisture Fighter and the humidity indicator alongside your buds in their curing jar.
- Let the Fighter do its thing. When the dot on the humidity card turns from pink to blue, swap out the Humidity Fighter for a fresh one.
- Reset the reusable indicator back to the pink setting to keep track of the new Fighter.